In this article, we will discuss how to make a Custom User Email Verification / Activation Laravel for the user and send an activation link to the user registered email address.
Before starting with the custom user email verification and activation. Please make sure, we need a basic Laravel setup with the Laravel default Authentication. If you are not familiar with this setup, please follow the links.
Table of Contents
Creating New Modal and Migration for VerifyUser
We need to create a new table in our database which is holding the verification code. This code is sent to the user email for account activation. Let go with the given Laravel Artisan command:
php artisan make:modal VerifyUser -m
You can run this command in command prompt, terminal, git bash or any of the IDE which provides the CLI interface. After running this command, generate a modal VerifyUser.php in the App folder. This command also create a migration file verify_user for VerifyUser.php modal under database/migration folder because we are using -m option.
Update the Migration file and Migrate Table
Now its time to update the migration file and migrate table. The migration file is available in database/migrationsfolder and file name you get in the console when you create the modal command. Let replace the default code with the given code.
<?php

use Illuminate\Support\Facades\Schema;
use Illuminate\Database\Schema\Blueprint;
use Illuminate\Database\Migrations\Migration;

class CreateVerifyUsersTable extends Migration
{
    /**
     * Run the migrations.
     *
     * @return void
     */
    public function up()
    {
        Schema::create('verify_users', function (Blueprint $table) {
            $table->integer('user_id');
            $table->string('token');
            $table->timestamps();
        });
    }

    /**
     * Reverse the migrations.
     *
     * @return void
     */
    public function down()
    {
        Schema::dropIfExists('verify_users');
    }
}
Nore user_idthat will be the foreign key of the primary key from the user’s table. Also, modify the migration file for the user’s table to include a new boolean field to maintain the status of account verification.
$table->boolean('verified')->default(false);Now the time to refresh the DB using migrate:refresh command.
php artisan migrate:refresh
Rolling back: 2018_02_23_175157_create_verify_users_table
Rolled back: 2018_02_23_175157_create_verify_users_table
Rolling back: 2014_10_12_100000_create_password_resets_table
Rolled back: 2014_10_12_100000_create_password_resets_table
Rolling back: 2014_10_12_000000_create_users_table
Rolled back: 2014_10_12_000000_create_users_table
Migrating: 2014_10_12_000000_create_users_table
Migrated: 2014_10_12_000000_create_users_table
Migrating: 2014_10_12_100000_create_password_resets_table
Migrated: 2014_10_12_100000_create_password_resets_table
Migrating: 2018_02_23_175157_create_verify_users_table
Migrated: 2018_02_23_175157_create_verify_users_table
Use of the above command, All the present table’s rollbacked and recreated. Please note that use of this caused lost all the present data.
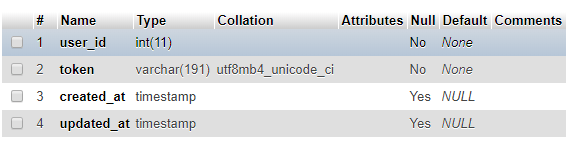
With this, verify_userstable created in your database with following structure.
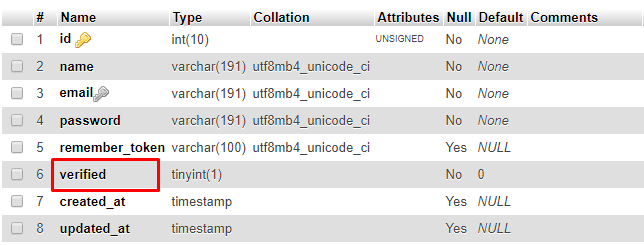
and the users table is modified, and having verified field. Please check the given screenshot
Define Relations in Modal
Now, our tables are ready. Let’s now go ahead and specify the one-to-one relationship between Userand VerifyUserModel.
Add following method to the User.phpModel class. Because Laravel already provides the default User Modal.
public function verifyUser()
{
  return $this->hasOne('App\VerifyUser');
}
Update following class to the VerifyUser.php Model class. Because we already create this modal when we create the migration.
class VerifyUser extends Model
{
    protected $guarded = [];

    public function user()
    {
        return $this->belongsTo('App\User', 'user_id');
    }
}
Send Verification Email to Registered User Email
To send email’s make sure you have your mail properties set up in .env file of your project. Laravel provides the default configuration for Mailtrap SMTP. You need to add your Mailtrap API credentials in the .env file.
In Laravel, all the emails sent by the Mailable class. To generate one such class for our verify user’s email on registration. Let’s generate a class with artisan command. Run the given below command in your terminal.
php artisan make:mail VerifyMail
After above command is executed, A new Class named VerifyMail.phpwill be generated under App/Mail. This class will have a build method which defines which view file to send an email.
<?php

namespace App\Mail;

use Illuminate\Bus\Queueable;
use Illuminate\Mail\Mailable;
use Illuminate\Queue\SerializesModels;
use Illuminate\Contracts\Queue\ShouldQueue;

class VerifyMail extends Mailable
{
  use Queueable, SerializesModels;

  public $user;

  /**
  * Create a new message instance.
  *
  * @return void
  */
  public function __construct($user)
  {
    $this->user = $user;
  }

  /**
  * Build the message.
  *
  * @return $this
  */
  public function build()
  {
    return $this->view('emails.verifyUser');
  }
}
We will create a emails folder under resources/views in which we will keep our email views. Also as you can see we have declared the $user as public and we are setting the variable in the constructor. Variables are declared as a public is by default available in the view file. Thus you can directly refer to the variable to get the user-related data.
Let’s go ahead and create the view file to send an email. Create a new file verifyUser.blade.phpunder resources/views/emails and add following contents into it.
<!DOCTYPE html>
<html>
<head>
<title>Welcome Email</title>
</head>
<body>
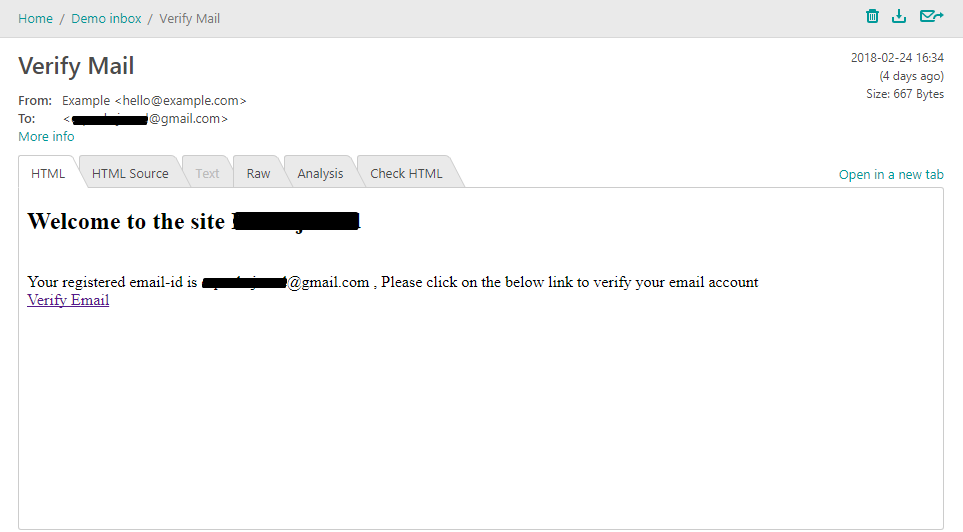
<h2>Welcome to the site {{$user['name']}}</h2>
<br/>
Your registered email-id is {{$user['email']}} , Please click on the below link to verify your email account
<br/>
<a href="{{url('user/verify', $user->verifyUser->token)}}">Verify Email</a>
</body>
</html>
Now since we have the necessary code ready to send the verification email to the user. Let’s modify our RegistrationController class to send emails. This class located under App/Http/Controllers/Auth and modify the create method as given below:
protected function create(array $data)
{
  $user = User::create([
    'name' => $data['name'],
    'email' => $data['email'],
    'password' => bcrypt($data['password']),
  ]);
  $verifyUser = VerifyUser::create([
    'user_id' => $user->id,
    'token' => sha1(time())
  ]);
  \Mail::to($user->email)->send(new VerifyMail($user));

  return $user;
}
We are generating a new random token using sha1(time())and storing it in the verify_users table against the user_id, After that, we use the Mail facade to send VerifyMail to the users.
Setup Route and Controller for Verify User Functionality
Let’s now functionality of user verification that is the code that will be executed when the user clicks on the link sent to his email account.
Create a route for verify token, It will be better if you keep it together with your Authentication routes.
Route::get('/user/verify/{token}', 'Auth\RegisterController@verifyUser');Since the functionality is related to User Registration we will create a new method verifyUser in RegisterController.php
public function verifyUser($token)
{
  $verifyUser = VerifyUser::where('token', $token)->first();
  if(isset($verifyUser) ){
    $user = $verifyUser->user;
    if(!$user->verified) {
      $verifyUser->user->verified = 1;
      $verifyUser->user->save();
      $status = "Your e-mail is verified. You can now login.";
    } else {
      $status = "Your e-mail is already verified. You can now login.";
    }
  } else {
    return redirect('/login')->with('warning', "Sorry your email cannot be identified.");
  }
  return redirect('/login')->with('status', $status);
}
The verifyuser method accepts a token from the URL and it goes ahead and finds the user that is associated with that token. It confirms that the user exists and is not verified yet and then goes ahead and changes the verification status in the database. Various status and warning messages are viewed when redirecting the user to display in the view file.
Restricting User Access for Un-Verified Users
Now, we have our email verification and user account activation process. And need one more important thing to be done before mark this complete. We should not be allowed the un-verified user’s to access the application pages until they are verified. Thus we need to apply checks at two places “after user Login” and “after new user Registration”.
public function authenticated(Request $request, $user)
{
  if (!$user->verified) {
    auth()->logout();
    return back()->with('warning', 'You need to confirm your account. We have sent you an activation code, please check your email.');
  }
  return redirect()->intended($this->redirectPath());
}
The authenticated method is executed just after the user is authenticated. We will override this and will use this to check if the user is activated. If not we will log him out and send back to login page with the warning message.
Modify RegisterController.php and override the registered method from RegistersUsers
protected function registered(Request $request, $user)
{
  $this->guard()->logout();
  return redirect('/login')->with('status', 'We sent you an activation code. Check your email and click on the link to verify.');
}
The registered method is executed just after the user is registered into the application, we will override and modify this to log him out and send him back to login with the status message.
Last we need to modify our login.blade.php file which is located under resources/views/auth. Add the following code to display the appropriate status messages.
@if (session('status'))
  <div class="alert alert-success">
    {{ session('status') }}
  </div>
@endif
@if (session('warning'))
  <div class="alert alert-warning">
    {{ session('warning') }}
  </div>
@endif
Conclusion
In this article, we are discussing the custom email verification for users. This is not the only way to build this kind of email verification. Laravel provides the rich feature for development. So we can do more secure and flexible as per the needs. This is the basic solution for user email verification.
Please check back our other Laravel post. And feel free to comments for any query.
If you like our content, please consider buying us a coffee.
Thank you for your support!
Buy Me a Coffee
Hello,
Thx for this beautiful tutorial. Easy to understand and few click to see the result.
I tried it and i have some problem with the sending mail.
I see the message after authentication but not mail sent.
I tried with Mailtrap but nothing.
Can you help me
Hi,
It’s ok for me. Some mystake in editing the RegisterController. But now i have an over problem.
“Restricting User Access for Un-Verified Users” doesn’t work for me. the user can access to my website without verification.
Hi,
I finally found a solution to make “Restricting User Access for Un-Verified Users” work. In laravel 5.6, we need to copy public function authenticated(Request $request, $user) and paste in “vendor\laravel\framework\src\Illuminate\Foundation\Auth\AuthenticatesUsers.php”. Replace the function in the file.
Sorry for delayed response 🙂
You can use an authenticated method.
You just need to override method because that method is empty.
/**

* The user has been authenticated.

*

* @param  \Illuminate\Http\Request  $request

* @param  mixed  $user

* @return mixed

*/

protected function authenticated(Request $request, $user)

{

//

}
Create this function in your LoginController.php and add your logic to perform.
Don’t update this function in the framework file. It’s not a good practice. Also when we update the framework then we lost our customizations.
Hello, thanks for this amazing tutorial. The tutorial worked well for me but, when I click the email sent in my inbox it is not verifying me.
Thanks Jeff, You need to setup the SMTP then you will receive the email. You can test this with mailtrap. Create your mailtrap account and update the credentials in the “.env” file.
Trying to get property ‘verified’ of non-object?
Thank you! It was very helpful for sure!
Excelente amigo. Muchas gracias.
Great Tutorial,
Only one minor issue.
‘token’ => sha1(time()) creates the same id if it is done in bulk. I suggest others to use a combination of sha1(time()) and random string as given below
$public_id_random = $utility->generateRandomString();
‘token’ => sha1(time()) .$public_id_random;
Assuming the below function is in some Utility class
function generateRandomString($length = 15)
{
$characters = ‘0123456789abcdefghijklmnopqrstuvwxyzABCDEFGHIJKLMNOPQRSTUVWXYZ’;
$charactersLength = strlen($characters);
$randomString = ”;
for ($i = 0; $i < $length; $i++) {
$randomString .= $characters[rand(0, $charactersLength – 1)];
}
return $randomString;
}
Thanks
hey pankaj this is rahul rathod from mumbai i can you create a project on mobile otp verification in php laravel
Give Error message:
Symfony\Component\Debug\Exception\FatalThrowableError
Class ‘App\Http\Controllers\Auth\VerifyUser’ not found
Add this to import the the class:
use App\Mail\VerifyMail;
do you have git repo for this tutorial?
hi and tnx
i faced this error
Trying to get property ‘token’ of non-object….
Hello Thankyou so much for this nice post. I saved my alot of time. Quick and straight help. Thanks again
How can we add expiration time for the link
Nice tutorial.
I think it would be better if you put the project on GitHub or GitLab.
It helps us to compare our codes.
Thank You
I want to thank you very much
You’re a such great guy
God bless you
Hello
How can we resend the link to particular user
And
How to manage link expiration ?