
In this article, we will discuss “how to create a taxonomy for users in WordPress”. As we know, WordPress is the most usable CMS (Content Management System) in the world. It provides a lot of features to the developer to make the development easy.
Today, we discuss a uniques feature where we create a taxonomy for the user. Till now, we know this taxonomy is used with post or custom post types. But here the technique which helps to make taxonomy for the WordPress users. You can use these taxonomy terms for multiple reasons. Many plugins available and offer this functionality with any code change. Here, we implement our custom code to achieve these results. So you have to add the following code in each step into your “funcitons.php”.
Table of Contents
Register Custom Taxonomy
Create a custom taxonomy “departments”, use the given example code.
// Register Custom Taxonomy
function custom_taxonomy() {
$labels = array(
'name' => _x( 'Departments', 'Departments Name', 'text_domain' ),
'singular_name' => _x( 'Department', 'Department Name', 'text_domain' ),
'menu_name' => __( 'Departments', 'text_domain' ),
'all_items' => __( 'All Departments', 'text_domain' ),
'parent_item' => __( 'Parent Department', 'text_domain' ),
'parent_item_colon' => __( 'Parent Department:', 'text_domain' ),
'new_item_name' => __( 'New Department Name', 'text_domain' ),
'add_new_item' => __( 'Add Department', 'text_domain' ),
'edit_item' => __( 'Edit Department', 'text_domain' ),
'update_item' => __( 'Update Department', 'text_domain' ),
'view_item' => __( 'View Department', 'text_domain' ),
'separate_items_with_commas' => __( 'Separate department with commas', 'text_domain' ),
'add_or_remove_items' => __( 'Add or remove departments', 'text_domain' ),
'choose_from_most_used' => __( 'Choose from the most used', 'text_domain' ),
'popular_items' => __( 'Popular Departments', 'text_domain' ),
'search_items' => __( 'Search Departments', 'text_domain' ),
'not_found' => __( 'Not Found', 'text_domain' ),
'no_terms' => __( 'No departments', 'text_domain' ),
'items_list' => __( 'Departments list', 'text_domain' ),
'items_list_navigation' => __( 'Departments list navigation', 'text_domain' ),
);
$args = array(
'labels' => $labels,
'hierarchical' => true,
'public' => true,
'show_ui' => true,
'show_admin_column' => true,
'show_in_nav_menus' => true,
'show_tagcloud' => true,
);
register_taxonomy( 'departments', 'user', $args );
}
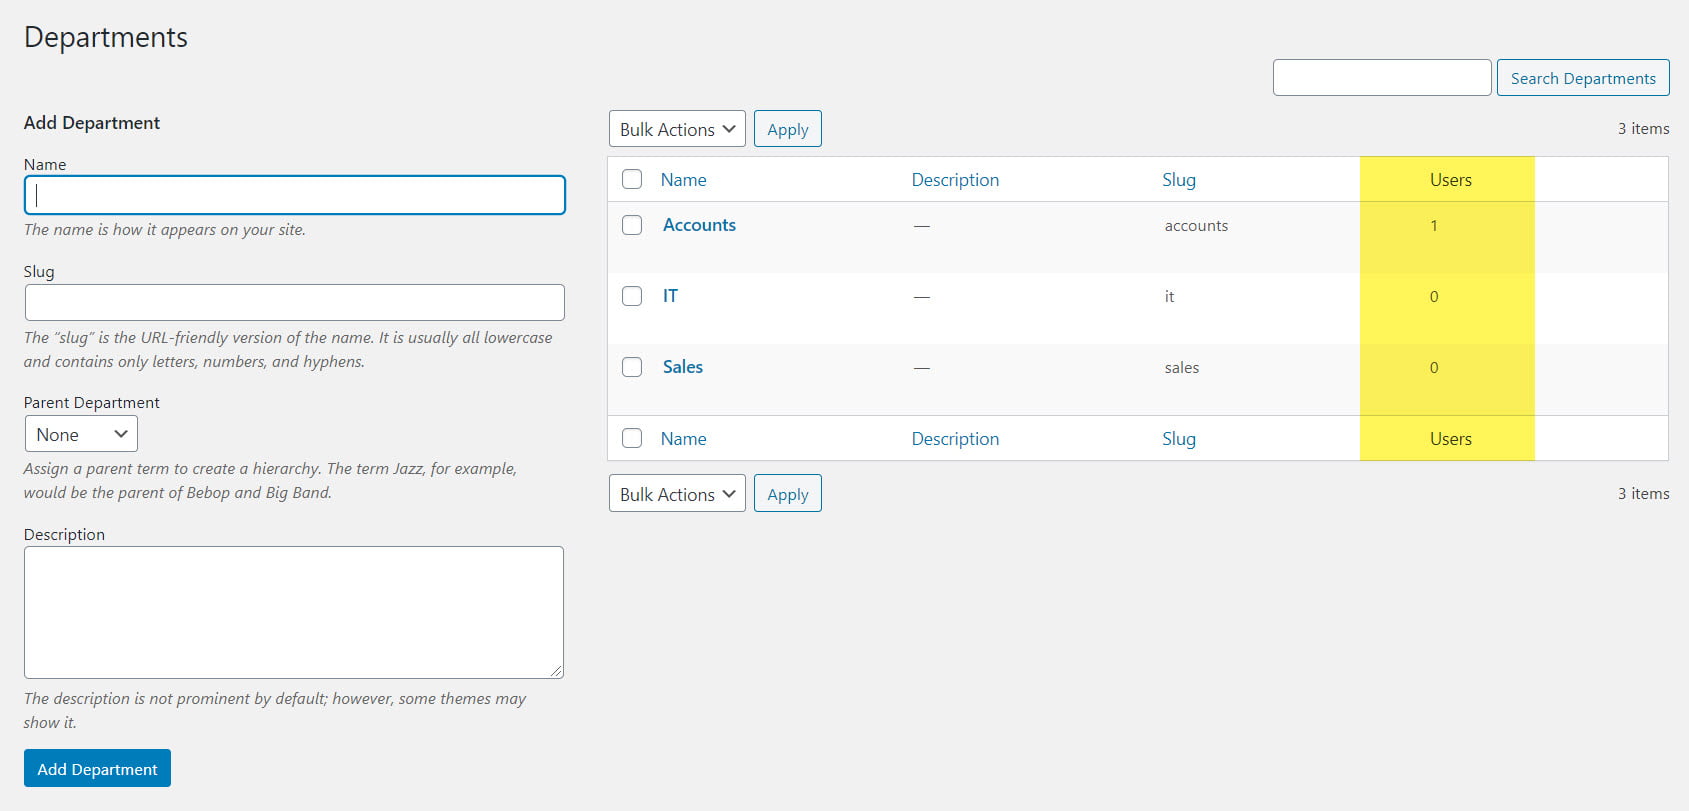
add_action( 'init', 'custom_taxonomy', 0 );After creating the custom taxonomy, it is visible in the admin panel. But for user taxonomy, this will not visible in the admin panel. You have to add the admin page manually for this.
Create Admin Page
Create the admin page for the “departments” taxonomy under the “Users” menu. It works the same as any other taxonomy page in the admin.
 /**
 * Admin page for the 'departments' taxonomy
 */
function cb_add_departments_taxonomy_admin_page() {

  $tax = get_taxonomy( 'departments' );

  add_users_page(
    esc_attr( $tax->labels->menu_name ),
    esc_attr( $tax->labels->menu_name ),
    $tax->cap->manage_terms,
    'edit-tags.php?taxonomy=' . $tax->name
  );

}
add_action( 'admin_menu', 'cb_add_departments_taxonomy_admin_page' );
Here, I’m using “admin_menu” wp hook to register the page. You can get more details here.

Unset Default Column & Add Users Column
In this, we have to unset the “posts” column and add a “users” column on the “manage departments” admin page.
/**
 * Unsets the 'posts' column and adds a 'users' column on the manage departments admin page.
 */
function cb_manage_departments_user_column( $columns ) {

  unset( $columns['posts'] );

  $columns['users'] = __( 'Users' );

  return $columns;
}
add_filter( 'manage_edit-departments_columns', 'cb_manage_departments_user_column' );
After adding the code into the functions file. Time to update the user’s column count.
Update Users Column Count
Displays content for custom columns on the manage departments page in the admin.
/**
 * @param string $display WP just passes an empty string here.
 * @param string $column The name of the custom column.
 * @param int $term_id The ID of the term being displayed in the table.
 */
function cb_manage_departments_column( $display, $column, $term_id ) {

  if ( 'users' === $column ) {
    $term = get_term( $term_id, 'departments' );
    echo $term->count;
  }
}
add_filter( 'manage_departments_custom_column', 'cb_manage_departments_column', 10, 3 );
I’m using “manage_{taxonomy}_custom_column” wp hook. You can get more details here.
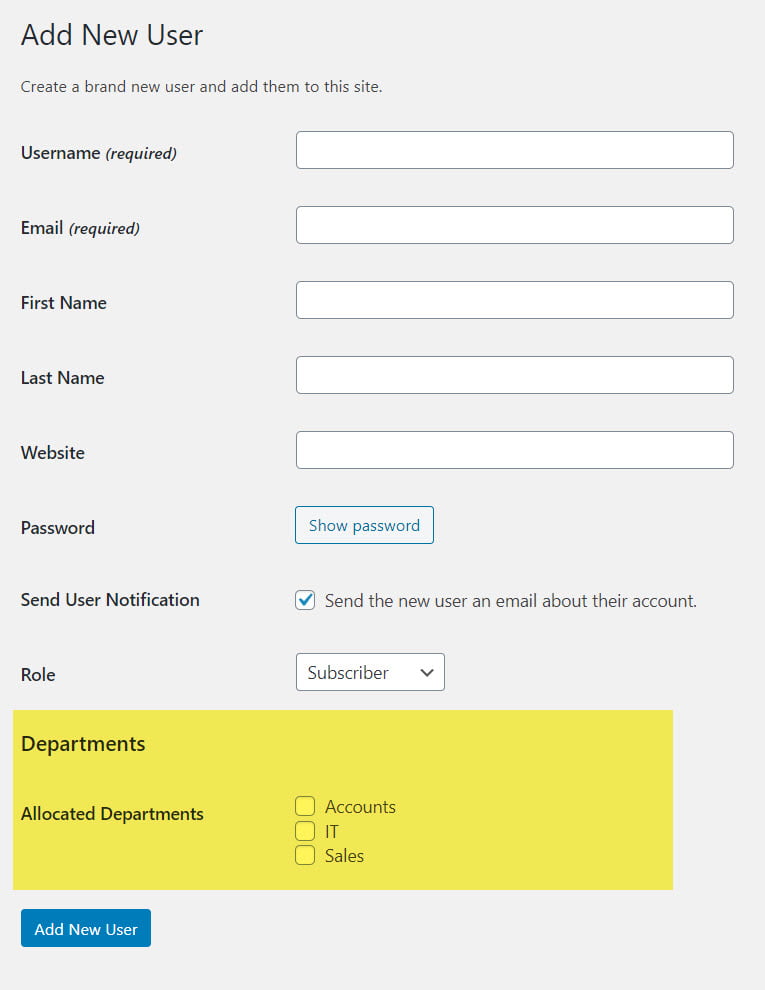
Add the form in New /Edit user profile page
Add an additional settings section on the new/edit user profile page in the admin. This section allows users to select a department from a checkbox of terms from the “departments” taxonomy. This is just one example of many ways this can be handled.
/**
 * @param object $user The user object currently being edited.
 */
function cb_edit_user_department_section( $user ) {
  global $pagenow;

  $tax = get_taxonomy( 'departments' );

  /* Make sure the user can assign terms of the departments taxonomy before proceeding. */
  if ( !current_user_can( $tax->cap->assign_terms ) )
    return;

  /* Get the terms of the 'departments' taxonomy. */
  $terms = get_terms( 'departments', array( 'hide_empty' => false ) ); ?>

  <h3><?php _e( 'Departments' ); ?></h3>

  <table class="form-table">

    <tr>
      <th><label for="departments"><?php _e( 'Allocated Departments' ); ?></label></th>

      <td><?php

      /* If there are any departments terms, loop through them and display checkboxes. */
      if ( !empty( $terms ) ) {
          echo cb_custom_form_field('departments', $terms, $user->ID);
      }

      /* If there are no departments terms, display a message. */
      else {
        _e( 'There are no departments available.' );
      }

      ?></td>
    </tr>

  </table>
<?php }

add_action( 'show_user_profile', 'cb_edit_user_department_section' );
add_action( 'edit_user_profile', 'cb_edit_user_department_section' );
add_action( 'user_new_form', 'cb_edit_user_department_section' );
You can get more details on used wp hooks “show_user_profile”, “edit_user_profile”, and “user_new_form”.
Render Custom field Dropdown or Checkbox
In the above mention code snippet, I’m using the function “cb_custom_form_field”. This function returns the form field.
/**
 * return field as dropdown or checkbox, by default checkbox if no field type given
 * @param: name = taxonomy, options = terms avaliable, userId = user id to get linked terms
 */
function cb_custom_form_field( $name, $options, $userId, $type = 'checkbox') {
  switch ($type) {
    case 'checkbox':
      foreach ( $options as $term ) :
      ?>
        <label for="departments-<?php echo esc_attr( $term->slug ); ?>">
          <input type="checkbox" name="departments[]" id="departments-<?php echo esc_attr( $term->slug ); ?>" value="<?php echo $term->slug; ?>" <?php if ( $pagenow !== 'user-new.php' ) checked( true, is_object_in_term( $userId, 'departments', $term->slug ) ); ?>>
          <?php echo $term->name; ?>
        </label><br/>
      <?php
      endforeach;
      break;
    case 'dropdown':
      $selectTerms = [];
      foreach ( $options as $term ) {
        $selectTerms[$term->term_id] = $term->name;
      }

      // get all terms linked with the user
      $usrTerms = get_the_terms( $userId, 'departments');
      $usrTermsArr = [];
      if(!empty($usrTerms)) {
        foreach ( $usrTerms as $term ) {
          $usrTermsArr[] = (int) $term->term_id;
        }
      }
      // Dropdown
      echo "<select name='{$name}'>";
      echo "<option value=''>-Select-</option>";
      foreach( $selectTerms as $options_value => $options_label ) {
        $selected = ( in_array($options_value, array_values($usrTermsArr)) ) ? " selected='selected'" : "";
        echo "<option value='{$options_value}' {$selected}>{$options_label}</option>";
      }
      echo "</select>";
      break;
  }
}
The function default type is set as a checkbox. After updating the code in the functions file. User profile page looks like this:
Rendering dropdown
Send type as dropdown when calling the “cb_custom_form_field”, as given below.
echo cb_custom_form_field('departments', $terms, $user->ID, 'dropdown');After updating the code in the functions file. User profile page looks like this:

Save Custom Form
Saves the term selected on the new or edit user profile page in the admin. This function is triggered when the page is updated. We just grab the posted data and use wp_set_object_terms() to save it.
/**
 * @param int $user_id The ID of the user to save the terms for.
 */
function cb_save_user_department_terms( $user_id ) {

  $tax = get_taxonomy( 'departments' );

  /* Make sure the current user can edit the user and assign terms before proceeding. */
  if ( !current_user_can( 'edit_user', $user_id ) && current_user_can( $tax->cap->assign_terms ) )
    return false;

  $term = $_POST['departments'];
  $terms = is_array($term) ? $term : (int) $term; // fix for checkbox and select input field

  /* Sets the terms (we're just using a single term) for the user. */
  wp_set_object_terms( $user_id, $terms, 'departments', false);

  clean_object_term_cache( $user_id, 'departments' );
}

add_action( 'personal_options_update', 'cb_save_user_department_terms' );
add_action( 'edit_user_profile_update', 'cb_save_user_department_terms' );
add_action( 'user_register', 'cb_save_user_department_terms' );
You can get more details on used wp hooks “personal_options_update”, “edit_user_profile_update”, and “user_register”.
Restrict Username Same as Taxonomy
Disables the “departments” username when someone tries to registers. This is to avoid any conflicts with the custom “author/departments” slug used for the “rewrite” argument when registering the “departments” taxonomy. This will cause WordPress to output an error that the username is invalid if it matches “departments”.
/**
 * @param string $username The username of the user before registration is complete.
 */
function cb_disable_departments_username( $username ) {

  if ( 'departments' === $username )
    $username = '';

  return $username;
}
add_filter( 'sanitize_user', 'cb_disable_departments_username' );
You can get more details on used wp hook “sanitize_user”.
Highlight Active Menu Item
Here, I’m using the “parent_file” filter. This helps us to update the parent file name. The global variable “$submenu_file” gives us the present submenu URL with the query string. After the “$submenu_file” and taxonomy validation, just return the “$parent_file” name as mentioned below.
/**
 * Update parent file name to fix the selected menu issue
 */
function cb_change_parent_file($parent_file)
{
    global $submenu_file;

    if (
    	isset($_GET['taxonomy']) &&
    	$_GET['taxonomy'] == 'departments' &&
    	$submenu_file == 'edit-tags.php?taxonomy=departments'
    )
    $parent_file = 'users.php';

    return $parent_file;
}
add_filter('parent_file', 'cb_change_parent_file');
After update code into the function file. Whenever we visit the user taxonomy then users menu is open and taxonomy is highlighting. You can get more details on used wp hook “parent_file”.
Conclusion
In this article, we have discussed “How to Create Taxonomy for Users in WordPress”. I hope you like this tutorial, we will discuss more WordPress, Laravel and many more in my coming tutorials. Please feel free to add the comment if any query or you can submit your feedback 🙂
Keep Learning, Stay Safe 🙂
You may like:
Laravel Image Processing – Intervention Image Package
Handling Multiple File Upload in Laravel
Laravel Logging Guzzle Requests in File
If you like our content, please consider buying us a coffee.
Thank you for your support!
Buy Me a Coffee
Very useful, thanks !
It’s amazing! Thank you very much!
Question: Can you restrict a role to only view users with a custom taxonomy?
I have followed this and have go it to work, it’s really good, the only thing lacking is being able to click on the number of users in the department and get a filtered list of the users. Any idea how I can do this?
Thanks for your time!
the post was very helpful