
In this article, we will discuss “Laravel Sanctum – Restful API Authentication”. Laravel Sanctum provides a simple authentication system for mobile applications, SPA (Single Page Application), and token-based API. We can generate multiple API tokens for the user account. Also, we can assign abilities/scopes which specify which actions the tokens are allowed to perform. For example, we can assign abilities as per the user roles.
Laravel Sanctum or Laravel Passport?
- Passport provides a complete solution for OAuth2 authentication. If OAuth is not required in your project then Sanctum is right for your application.
- Sanctum is light and easy to implement.
Table of Contents
Prerequisites
- Knowledge of Laravel, you can check our other post on Laravel.
- Basic knowledge of HTTP client postman. You are free to use any of HTTP client, s
Getting Started
Let’s setup a new Laravel application, use the following composer command into the terminal.
composer create-project laravel/laravel laravel-project --prefer-dist
After installation, configure the database. Open the “.env” file located at the root of the application and update the following.
DB_CONNECTION=mysql
DB_HOST=127.0.0.1
DB_PORT=3306
DB_DATABASE=testdb
DB_USERNAME=root
DB_PASSWORD=root
Installation/Setup Laravel Sanctum
Run the following command into the terminal. This will install Laravel Sanctum and its dependencies.
composer require laravel/sanctum
Next, we’ll publish Laravel Sanctum configuration and migration files using the following command:
php artisan vendor:publish --provider="Laravel\Sanctum\SanctumServiceProvider"
Now, run the database migrations:
php artisan migrate
Update Users Model
Before start using the Laravel Sanctum, we have to verify the User’s model. Make sure the Users model is using the “HasApiToken” trait. If required then, open the “app/Models/User.php” file and add the following modifications:
use Laravel\Sanctum\HasApiTokens;

class User extends Authenticatable
{
    use HasApiTokens, HasFactory, Notifiable;
}
Creating API’s
Here, we create three API endpoints to demonstrate the Laravel Sanctum works.
- register endpoint allows the user to register an account.
- login endpoint allows users to login/authenticate themselves.
- me endpoint returns the user details as per the token supplied, only when the token is valid.
Create Auth Controller
Let’s create an “AuthController”. Use the following artisan command.
php artisan make:controller Api\AuthController
After executing the command, the file “AuthController.php” will a generated in the “app/Http/Controllers/Api” folder.
Register User API
Open “AuthController.php” and add the code snippet below in it to create the method to register a user:
use Illuminate\Support\Facades\Hash;
use Illuminate\Support\Facades\Validator;

public function register(Request $request)
{
    // Validate request data
    $validator = Validator::make($request->all(), [
        'name' => 'required|string|max:255',
        'email' => 'required|email|unique:users|max:255',
        'password' => 'required|min:10',
    ]);

    // Return errors if validation error occur.
    if ($validator->fails()) {
        $errors = $validator->errors();
        return response()->json([
            'error' => $errors
        ], 400);
    }

    // Check if validation pass then create user and auth token. Return the auth token
    if ($validator->passes()) {
        $user = User::create([
            'name' => $request->name,
            'email' => $request->email,
            'password' => Hash::make($request->password)
        ]);
        $token = $user->createToken('auth_token')->plainTextToken;

        return response()->json([
            'access_token' => $token,
            'token_type' => 'Bearer',
        ]);
    }
}
First, validate the request data and verify as per the given rules data is valid. Once the user has been created, then we create a new personal access token using “createToken()” method. This will return a Laravel\Sanctum\NewAccessToken instance. We are accessing the plain-text value of the token using the “plainTextToken” property of the “NewAccessToken” instance.
Register User API Route
Open the routes/api.php file to create the route responsible for registering a user.
Route::post('/register', 'AuthController@register');Login User API
Let’s create the login method in “AuthController”.
use App\Models\User;
use Illuminate\Support\Facades\Auth;

public function login(Request $request)
{
    if (!Auth::attempt($request->only('email', 'password'))) {
        return response()->json([
            'message' => 'Invalid login details'
        ], 401);
    }

    $user = User::where('email', $request['email'])->firstOrFail();

    $token = $user->createToken('auth_token')->plainTextToken;

    return response()->json([
        'access_token' => $token,
        'token_type' => 'Bearer',
    ]);
}
Here, we are checking if the email and password are supplied actually matched with the existing user. After that creating a new personal access token for the user.
Login User API Route
Open the routes/api.php file to create the route responsible for login/authenticating a user.
Route::post('/login', 'AuthController@login');Get User API
Next, add the following code to the “AuthController.php”.
public function me(Request $request)
{
    return $request->user();
}
Here, we simply return the currently authenticated user.
Get User API Route
The “/me” endpoint needs to be accessible to only authenticated users. Here, we are using the sanctum authenticated guard. So let’s update the route as below:
Route::middleware('auth:sanctum')->group(function () {
    Route::get('/me', 'AuthController@me');
});
Update Route Service Provider
Before testing the API, let’s update the “RouteServiceProvider.php” located at “app/Providers”.
// Add the following line:
protected $namespaceApi = 'App\\Http\\Controllers\\Api';

// After that update the boot function.
Route::prefix('api')
    ->middleware('api')
    ->namespace($this->namespaceApi)
    ->group(base_path('routes/api.php'));
After this, our API routes will work perfectly.
Testing the API’s
I’m using the Postman HTTP client to test our APIs. Let serve the Laravel application using the following command.
php artisan serve
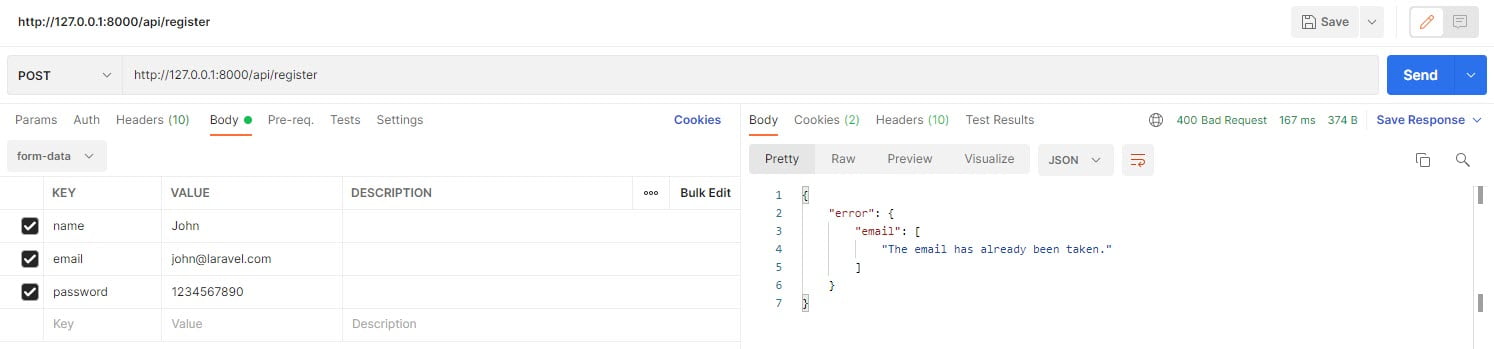
Create a New User
To create a new user, make a POST request to http://127.0.0.1:8000/api/register with a name, email, and password. Make sure that your password is at least 10 characters long as per the validation rules.

If we receive a validation error.
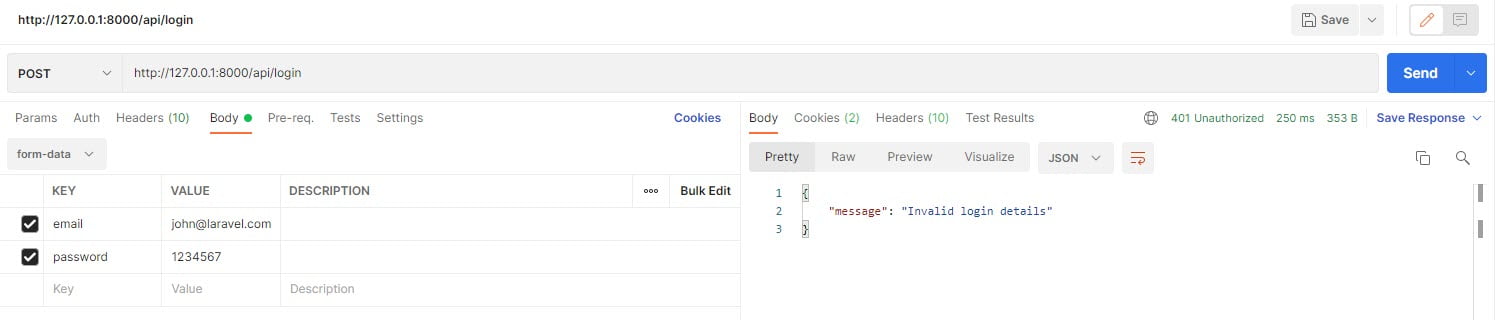
Login User
To login, make a POST request to http://127.0.0.1:8001/api/ login with your email and password.

If credentials are not valid then an error message is shown.
Get User
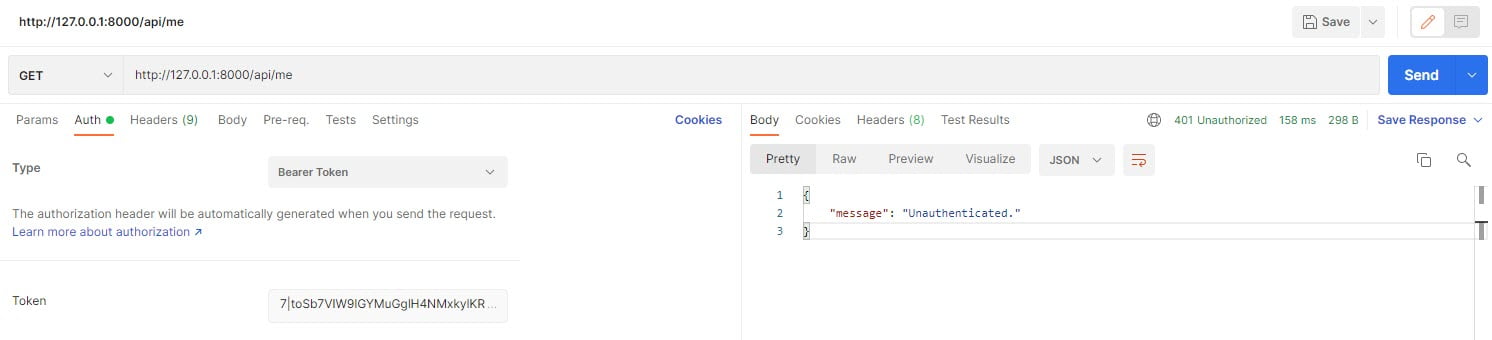
If we try to access the “/me” endpoint with a valid token, we should get something similar to the image below:
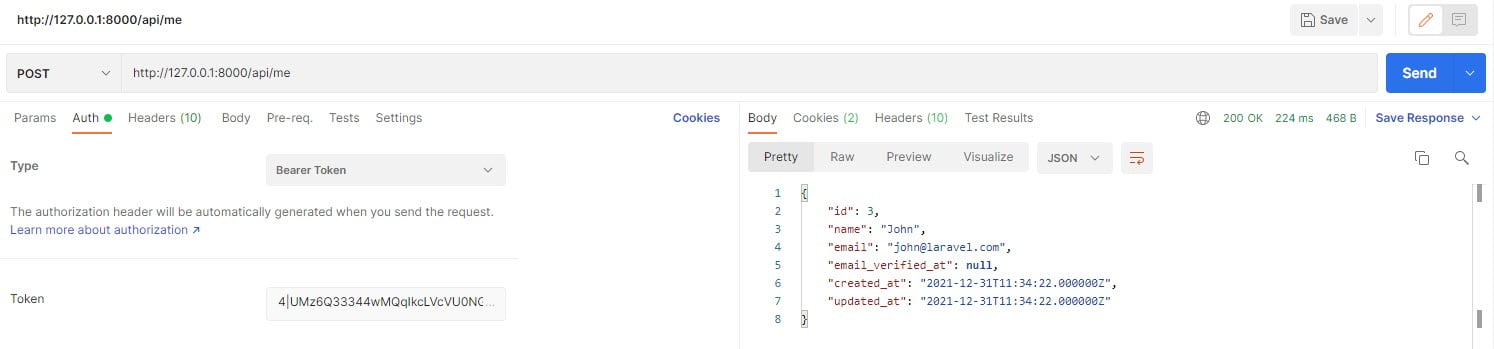
Otherwise, we should get user details as in the image below:
Conclusion
In this article, we are discussing “Laravel Sanctum – Restful API Authentication”. Laravel Sanctum is easy to install and configure, also we can generate a multi-token, with the specific role given to every token. Finally, the Laravel Sanctum API example is ended, hope you will like it. We will discuss more on Laravel, Laravel features and etc. Please feel free to add comments if any queries or suggestions.
Keep learning & stay safe 🙂
If you like our content, please consider buying us a coffee.
Thank you for your support!
Buy Me a Coffee