Laravel 5.7 Package Development from Scratch – Part 1
In this article, we will discuss “Laravel 5.7 Package Development from Scratch”. Here we describe the package development steps creating, maintaining and using packages. You can also check the official Laravel doc for package development. I’m creating an example package details given below:
Table of Contents
Prerequisites
We need a fresh Laravel setup where we create our custom package. If you are new in Laravel, then you can start with the following articles. Otherwise, you can continue with the package development steps.
- How to install Laravel 5 with Xampp
- Understanding Laravel Middleware
- Laravel Default Authentication Setup
Creating Package Skeleton
We are using “laravel/packager”, it will generate all the necessary files.
composer require jeroen-g/laravel-packager
After executing above composer command, It will add all the necessary dependencies into your Laravel application.
You can check the newly generated artisan commands in your terminal. Such as:
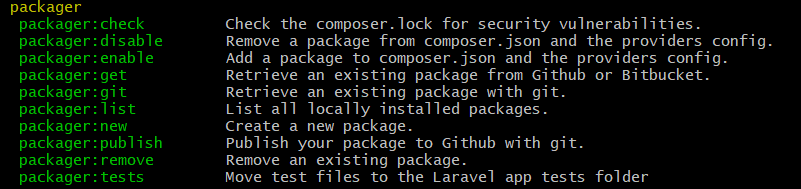
Now, time to run “packager:new” artisan command to create a new package.
// Syntax
php artisan packager:new vendor_name package_name

// Example
php artisan packager:new codebriefly codrpack
After executing the “packager:new” command, new directory “packages” created on the root of the Laravel app. The “packages” directory contains the newly created package within the folder name “codebriefly” and this directory contains the new package files named “codrpack“.
You need to add more details regarding author name, email, package homepage if any, and license info for your package.
You can also use the following command to create a package. It will ask questions on the terminal and all of your response updated in the package configuration. For example:
- What will be the vendor name?
- What will be the package name?
- Who is the author?
- What is the author email?
- What is the author Website?
- How would you describe the package?
- Under which license will it be released?
// Syntax
php artisan packager:new vendor_name package_name --i

// Example
php artisan packager:new codebriefly codrpack --i
Time to adjust your composer.json extra section to enable automatic package discovery.
"extra": {
    "laravel": {
        "providers": [
            "vendor_name\\package_name\\service_provider_name"
        ]
    }
},
All other autoload configuration update automatically. As you can check your “composer.json”.
"autoload": {
    "psr-4": {
        "vendor_name\\package_name\\": "src_path",
    }
},
"autoload-dev": {
    "psr-4": {
        "vendor_name\\package_name\\": "src_path",
    }
},
Everything is ready now, you can create classes inside “src” folder as per your requirement, but you have to add the required namespace. For example:
namespace Vendor_name\Package_name;
If you want to use your migrations, routes, configs, views or assets like js, CSS or images. You have to load them into your service provider. You can also read this in official documentation.
Publish Config File
You need to publish your package configuration file to the default application “config” directory. This will offer the user to override the package default configurations as per there requirements. You can use “publishes” method in the “boot” method of your service provider.
public function boot()
{
    $this->publishes([
        __DIR__.'/path/to/config/package.php' => config_path('package.php'),
    ]);
}
When users of your package execute “vendor:publish” command, then our package config file will be copied to the specific publish location.
Also, you need to add your service provider to “config/app.php” file. It is necessary when your package will be autoloaded via composer and automatic package discovery. But we are using the ” jeroen-g/laravel-packager” package. This will update the provider when we create a package.
<?php
return [

    ...
    'providers' => [

        /*
         * Package Service Providers...
         */
        vendor_name\package_name\service_provider_class::class,

    ],
    ...
];
If your package wants another package to complete the functionality. Then you can easily add them. You just need to add the required package into the package “composer.json”.
Create Github Repository
When you are done with for package functionality. And your package is ready for the community. Then you need to host your project on Github. It’s easy and simple to share your code with the community. We will discuss this how to use Github in out future articles.
Conclusion
In this article, we will discuss “Laravel 5.7 Package Development from Scratch”. Please feel free to add comments or you can submit your feedback. In tutorial next part, we will discuss how we add our package on packagist. Hope you like this article. You can also read more article on Laravel.
If you like our content, please consider buying us a coffee.
Thank you for your support!
Buy Me a Coffee