In this article, we will discuss “Laravel Authentication with Username or Email”. After implementing this, you can offer your application user to login with email or username. Laravel provides lots of features and make development easy.
If you are not familiar with the Laravel then you can start with given article or search here.
Laravel Default Authentication Setup
Secure User Authentication Regex Validation
Table of Contents
Generate default authentication scaffolding
You can use the following artisan command to create auth scaffolding.
php artisan make:auth
After executing the above mention command, it will create all the necessary file like migrations, view, and many more.
Update Migration
You need to update the user table migration and add new username column.
<?php

use Illuminate\Support\Facades\Schema;
use Illuminate\Database\Schema\Blueprint;
use Illuminate\Database\Migrations\Migration;

class CreateUsersTable extends Migration
{
    /**
     * Run the migrations.
     *
     * @return void
     */
    public function up()
    {
        Schema::create('users', function (Blueprint $table) {
            $table->increments('id');
            $table->string('name');
            $table->string('username')->unique();
            $table->string('email')->unique();
            $table->timestamp('email_verified_at')->nullable();
            $table->string('password');
            $table->rememberToken();
            $table->timestamps();
        });
    }

    /**
     * Reverse the migrations.
     *
     * @return void
     */
    public function down()
    {
        Schema::dropIfExists('users');
    }
}
After updating the migration time to execute the migrate command.
php artisan migrate
Now our database ready for use.
Update User Model
Now, time to update User model. Open your User Model and add the username column in the fillable array.
protected $fillable = [
    'name', 'email', 'password', 'username'
];
Update Register Controller
We need to update our “RegisterController.php”, which is located at “app/Http/Controller/Auth” directory. So open your Register Controller, you have to add a new validation rule for the “username” in the “validator()” method. Then similarly, you’ve to add the “username” field to “create()” method as well.
<?php

namespace App\Http\Controllers\Auth;

use App\User;
use App\Http\Controllers\Controller;
use Illuminate\Support\Facades\Hash;
use Illuminate\Support\Facades\Validator;
use Illuminate\Foundation\Auth\RegistersUsers;

class RegisterController extends Controller
{
    /*
    |--------------------------------------------------------------------------
    | Register Controller
    |--------------------------------------------------------------------------
    |
    | This controller handles the registration of new users as well as their
    | validation and creation. By default this controller uses a trait to
    | provide this functionality without requiring any additional code.
    |
    */

    use RegistersUsers;

    /**
     * Where to redirect users after registration.
     *
     * @var string
     */
    protected $redirectTo = '/home';

    /**
     * Create a new controller instance.
     *
     * @return void
     */
    public function __construct()
    {
        $this->middleware('guest');
    }

    /**
     * Get a validator for an incoming registration request.
     *
     * @param  array  $data
     * @return \Illuminate\Contracts\Validation\Validator
     */
    protected function validator(array $data)
    {
        return Validator::make($data, [
            'name' => 'required|string|max:255',
            'username' => 'required|string|max:20|unique:users',
            'email' => 'required|string|email|max:255|unique:users',
            'password' => 'required|string|min:6|confirmed',
        ]);
    }

    /**
     * Create a new user instance after a valid registration.
     *
     * @param  array  $data
     * @return \App\User
     */
    protected function create(array $data)
    {
        return User::create([
            'name' => $data['name'],
            'username' => $data['username'],
            'email' => $data['email'],
            'password' => Hash::make($data['password']),
        ]);
    }
}
Update Login Controller
We need to update our “LoginController.php”, which is located at “app/Http/Controller/Auth” directory. Open your Login Controller, here we only need to override one method called “credentials()”.
You can found this method at “Illuminate\Foundation\Auth\AuthenticatesUsers”. Here Laravel default authentication provides several methods to handle the authentication process. If you want to apply any kind of customization we only need to override the credentials() method.
<?php

namespace App\Http\Controllers\Auth;

use App\Http\Controllers\Controller;
use Illuminate\Foundation\Auth\AuthenticatesUsers;
use Illuminate\Http\Request;

class LoginController extends Controller
{
    /*
    |--------------------------------------------------------------------------
    | Login Controller
    |--------------------------------------------------------------------------
    |
    | This controller handles authenticating users for the application and
    | redirecting them to your home screen. The controller uses a trait
    | to conveniently provide its functionality to your applications.
    |
    */

    use AuthenticatesUsers;

    /**
     * Where to redirect users after login.
     *
     * @var string
     */
    protected $redirectTo = '/home';

    /**
     * Create a new controller instance.
     *
     * @return void
     */
    public function __construct()
    {
        $this->middleware('guest')->except('logout');
    }

    /**
     * Get the needed authorization credentials from the request.
     *
     * @param  \Illuminate\Http\Request  $request
     * @return array
     */
    protected function credentials(Request $request)
    {
        $field = filter_var($request->get($this->username()), FILTER_VALIDATE_EMAIL)
            ? $this->username()
            : 'username';

        return [
            $field => $request->get($this->username()),
            'password' => $request->password,
        ];
    }
}
Update Blade Template
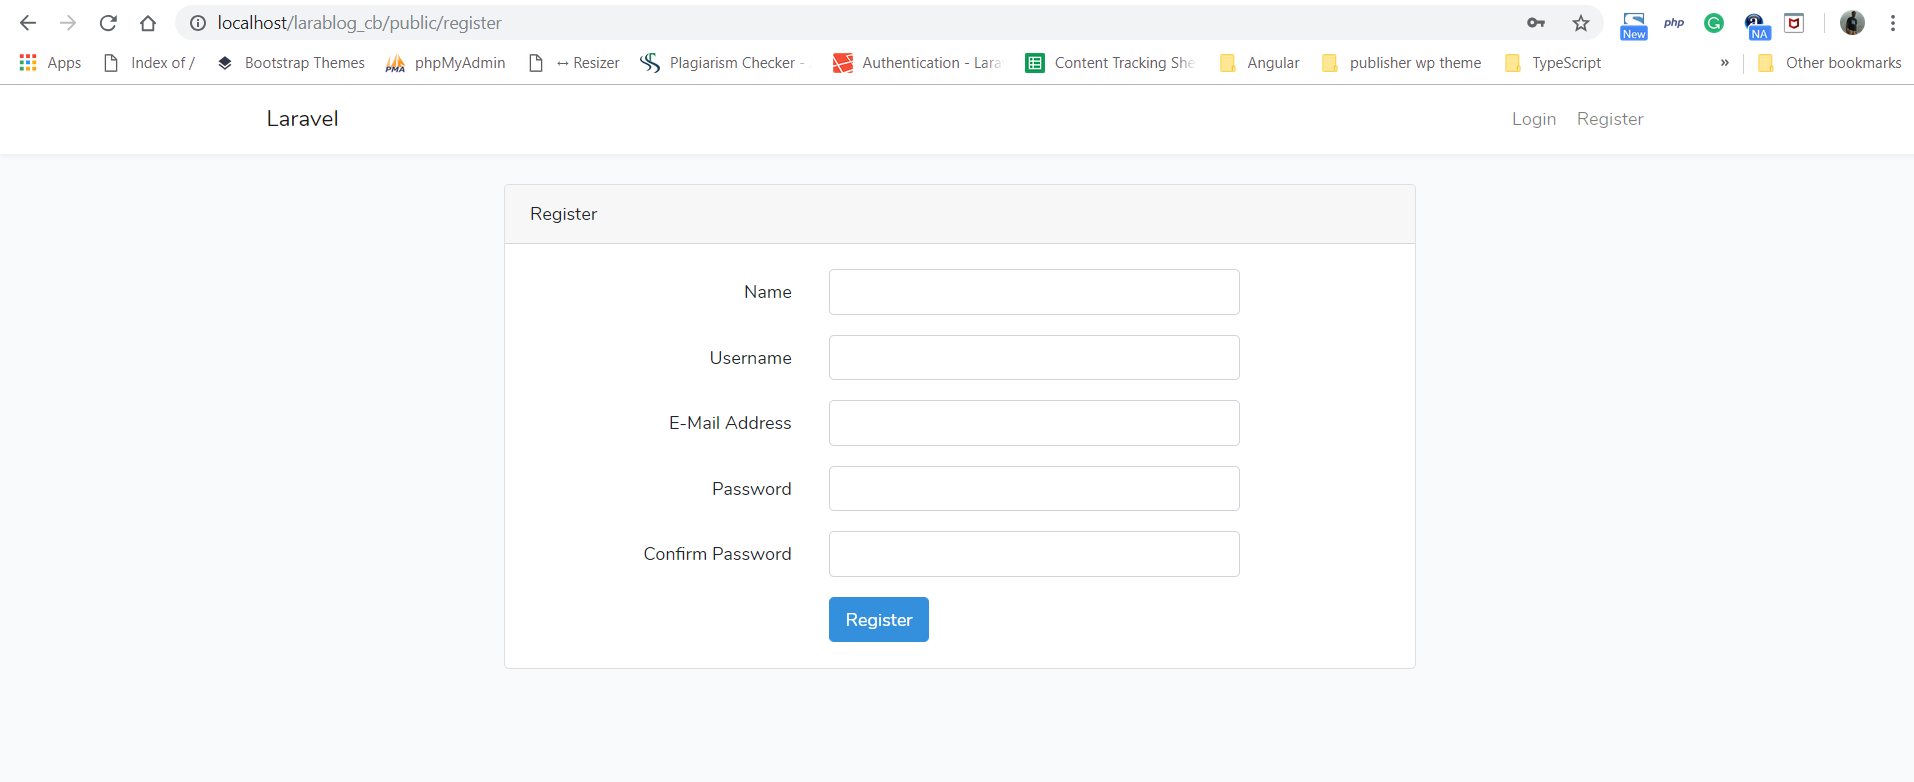
Now, time to update the register and login form.
Register
Open register.blade.php located at “resources/views/auth/”, update the following code snippet to add a username field.
...
<div class="form-group row">
    <label for="name" class="col-md-4 col-form-label text-md-right">{{ __('Username') }}</label>

    <div class="col-md-6">
        <input id="username" type="text" class="form-control{{ $errors->has('username') ? ' is-invalid' : '' }}" name="username" value="{{ old('username') }}" required autofocus>
        @if ($errors->has('username'))
            <span class="help-block">
                <strong>{{ $errors->first('username') }}</strong>
            </span>
        @endif
    </div>
</div>
...
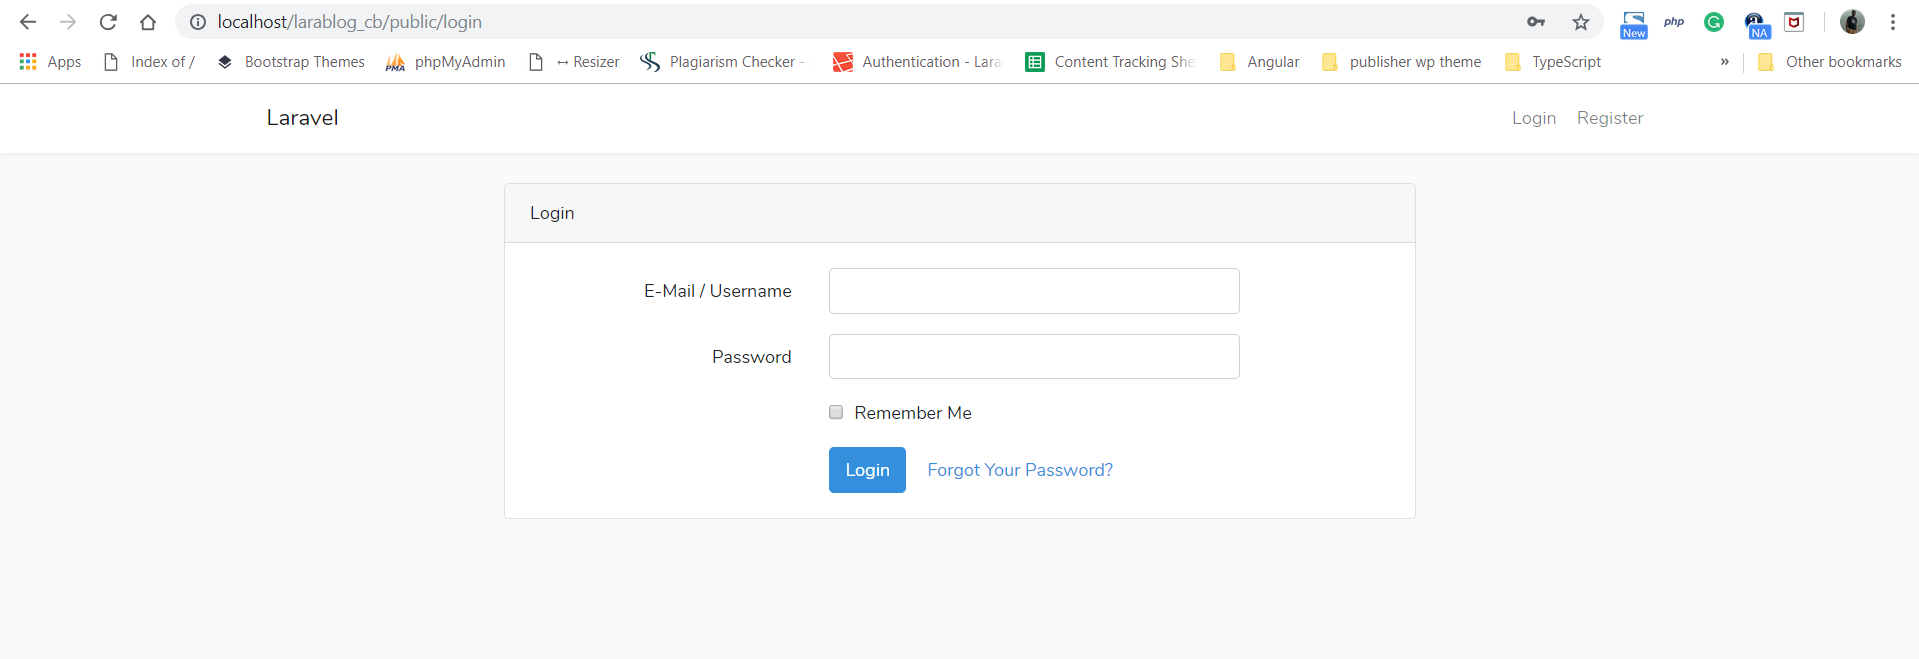
Login
Open login.blade.php located at “resources/views/auth/”, update the following code snippet to the email field. So your email can work for both username or email.
...
<input id="email" type="text" class="form-control{{ $errors->has('email') ? ' is-invalid' : '' }}" name="email" value="{{ old('email') }}" required autofocus>
...
Conclusion
In this article, we will discuss “Laravel Authentication with Username or Email”. Hope you like this article. Please feel free to add the comment if any query or you can submit your feedback 🙂
If you like our content, please consider buying us a coffee.
Thank you for your support!
Buy Me a Coffee
Thank you so much use full code