
In this article, we will discuss “How to Manage Password Strength – Angular”. There are multiple ways to implement this feature in your Angular application such as applying pattern validation, creating a password strength meter, or using any existing package. In this example, I’m using the Angular Reactive form. You will learn pattern validation and how to create a password strength meter.
Table of Contents
Getting Start
I’m using StackBlitz to run this example. This is an online IDE, so no need to setup Angular on local and you can share your code with the community. And, I’m assuming you are familiar with Angular, so I’m not adding basic steps in this article such as creating an angular project, adding Reactive form and etc.
At the end of this article, we are going to see how to use:
- Reactive Forms and Validators (In a simple way)
- Component interactions using @Input and @Output decorators
In the example, I will explain to you using two examples both are using RegExp to validate the form.
- Pattern Validation
- Password Strength Meter
Pattern Validation
Here, I’m creating a form with three fields name, email, and password. Validating those fields using RegEx.
Let create a component and update the layout. Open “pattern-validate.component.html” and update the following code.
<h1 class="text-primary text-center p-4 bg-light">Pattern Validation</h1>
<div class="col-md-12">
  <form [formGroup]="form1">
    <div class="mb-3">
      <label class="form-label">Name</label>
      <input type="text" class="form-control" formControlName="fullname" />
      <div
        class="alert alert-danger"
        *ngIf="!form1.get('fullname').valid && form1.get('fullname').touched"
      >
        Atleast 3 characters required and no special character allowed.
      </div>
    </div>
    <div class="mb-3">
      <label class="form-label">Email address</label>
      <input type="email" class="form-control" formControlName="email" />
      <div
        class="alert alert-danger"
        *ngIf="!form1.get('email').valid && form1.get('email').touched"
      >
        Invalid email id
      </div>
    </div>
    <div class="mb-3">
      <label class="form-label">Password</label>
      <input type="password" class="form-control" formControlName="password" />
      <div
        class="alert alert-danger"
        *ngIf="!form1.get('password').valid && form1.get('password').touched"
      >
        Password must contain more than 8 characters, 1 upper case letter, and 1
        special character
      </div>
    </div>

    <button type="submit" class="btn btn-primary" (click)="onSubmit()">
      Submit
    </button>
  </form>
  {{ form1.value | json }}
</div>
Open “pattern-validate.component.ts” and update the following code.
import { Component, OnInit } from '@angular/core';
import { FormBuilder, Validators } from '@angular/forms';

@Component({
  selector: 'app-pattern-validate',
  templateUrl: './pattern-validate.component.html',
  styleUrls: ['./pattern-validate.component.css'],
})
export class PatternValidateComponent {
  constructor(private fb: FormBuilder) {}

  form1 = this.fb.group({
    fullname: [
      null,
      [
        Validators.required,
        Validators.pattern(/^[A-z0-9]*$/),
        Validators.minLength(3),
      ],
    ],
    email: [
      null,
      [
        Validators.required,
        Validators.pattern(/^\w+([\.-]?\w+)*@\w+([\.-]?\w+)*(\.\w{2,3})+$/),
      ],
    ],
    password: [
      null,
      [
        Validators.required,
        Validators.pattern(
          /^(?=.*[A-Z])(?=.*[a-z])(?=.*[0-9])(?=.*[!@#\$%\^&\*])(?=.{8,})/
        ),
        Validators.minLength(8),
      ],
    ],
  });

  onSubmit() {
    if (this.form1.valid) {
      console.log('Form Submitted');
    } else {
      console.error('Form values are invalid.');
    }
  }
}
Form validation looks like.

Password Strength Meter
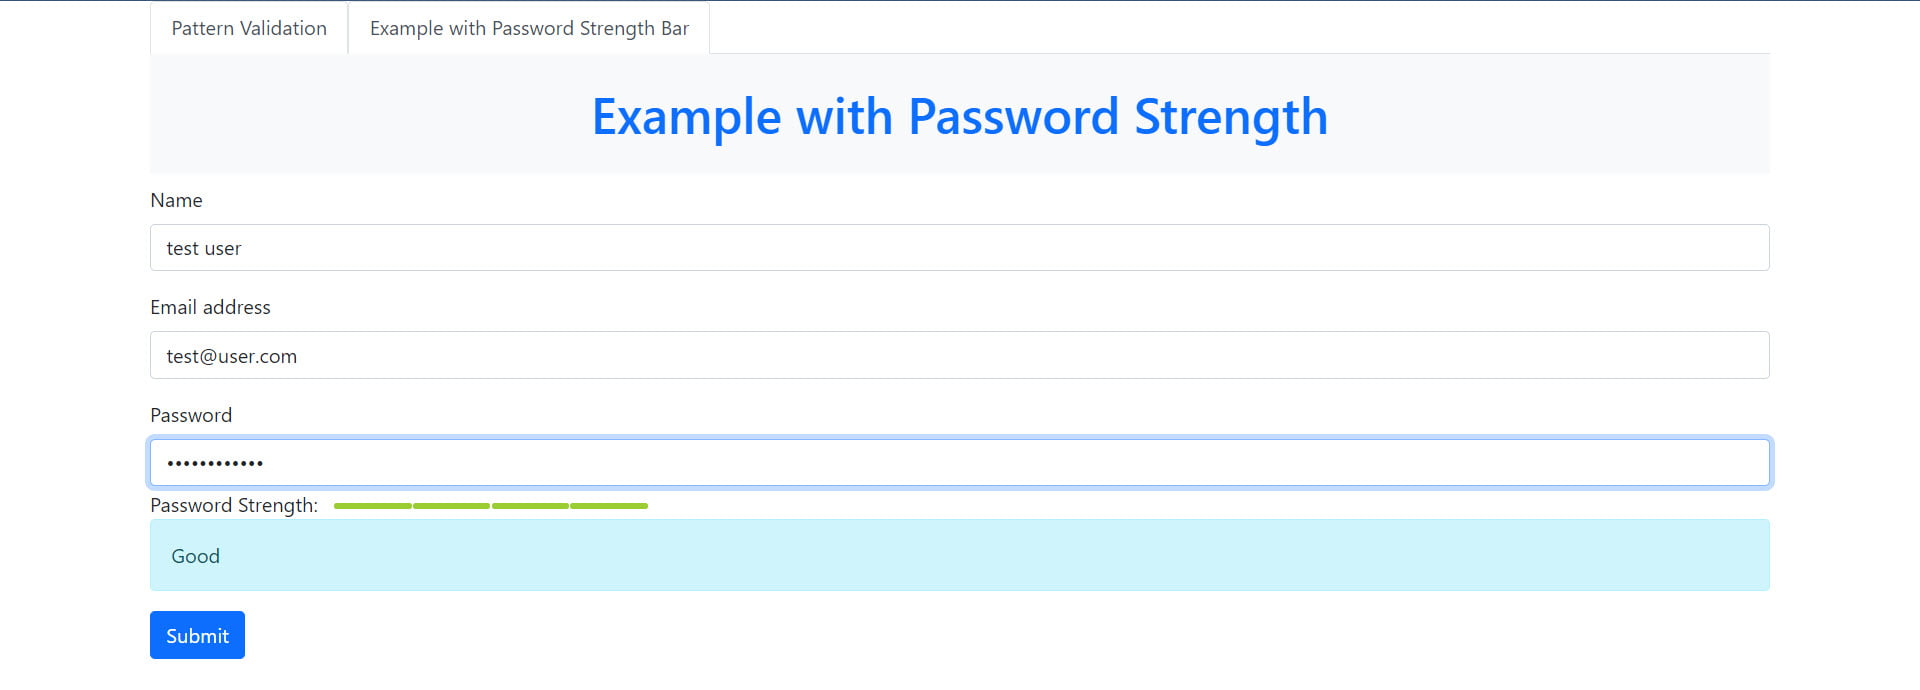
Here, we are going to add a strength bar with our password field. This will force users to choose a strong password. We are going to apply the following rules to the password.
- The password contains at least one special character
- Must contain at least one uppercase and lowercase character
- Last, must contains at least one number and 8 characters long
Each rule applied to our password using the RegEx. As per the rules, we show some color bars to indicate how strong our password is. If the password is not strong as expected, then the user is not authorized to submit the form.
Here, I’m creating a form with three fields name, email, and password. Validating those fields using RegEx. Additionally, showing a password strength meter with a password field. Let create a component and update the layout. Open “strength-bar.component.html” and update the following code.
<h1 class="text-primary text-center p-4 bg-light">
  Example with Password Strength
</h1>
<div class="col-md-12">
  <form [formGroup]="form2">
    <div class="mb-3">
      <label class="form-label">Name</label>
      <input type="text" class="form-control" formControlName="fullname" />
    </div>
    <div class="mb-3">
      <label class="form-label">Email address</label>
      <input type="email" class="form-control" formControlName="email" />
    </div>
    <div class="mb-3">
      <label class="form-label">Password</label>
      <input type="password" class="form-control" formControlName="password" />
      <strength-checker
        barLabel="Password Strength: "
        [passwordToVerify]="form2.value.password"
        (passwordStrength)="passwordValid($event)"
      ></strength-checker>
    </div>
    <button
      type="submit"
      class="btn btn-primary"
      [disabled]="!passwordIsValid"
      (click)="onSubmit()"
    >
      Submit
    </button>
  </form>
</div>
Open “strength-bar.component.ts” and update the following code.
import { Component } from '@angular/core';
import { FormBuilder, Validators } from '@angular/forms';

@Component({
  selector: 'app-strength-bar',
  templateUrl: './strength-bar.component.html',
  styleUrls: ['./strength-bar.component.css'],
})
export class StrengthBarComponent {
  constructor(private fb: FormBuilder) {}
  passwordIsValid = false;
  form2 = this.fb.group({
    fullname: [
      null,
      [
        Validators.required,
        Validators.pattern(/^[A-z0-9]*$/),
        Validators.minLength(3),
      ],
    ],
    email: [
      null,
      [
        Validators.required,
        Validators.pattern(/^\w+([\.-]?\w+)*@\w+([\.-]?\w+)*(\.\w{2,3})+$/),
      ],
    ],
    password: [null, [Validators.required]],
  });

  onSubmit() {
    if (this.form2.valid) {
      console.log('Form Submitted');
    } else {
      console.error('Form values are invalid.');
    }
  }

  passwordValid(event) {
    this.passwordIsValid = event;
  }
}
Create Child Component “Strength-checker”
Let’s create a child component “strength-checker.component.ts”.
The parent and child component interaction will be achieved by the Angular decorator such as “@Input” and “@Output”. We are going to intercept the data using the “ngOnChanges” method. Our component looks like the following.
import {
Component,
Input,
OnChanges,
SimpleChange,
Output,
EventEmitter,
} from '@angular/core';
@Component({
selector: 'strength-checker',
template: `<div class="strength">{{barLabel}}
<ul class="strengthBar">
<li class="point" [style.background-color]="bar0"></li>
<li class="point" [style.background-color]="bar1"></li>
<li class="point" [style.background-color]="bar2"></li>
<li class="point" [style.background-color]="bar3"></li>
</ul>
<br>
<p class="alert alert-info" *ngIf="msg">{{msg}}</p>
</div>`,
styles: [
`.strengthBar {
display: inline;
list-style: none;
margin: 0;
padding: 0;
vertical-align: 2px;
}
.point:last-of-type {
margin: 0 !important;
}
.point {
background: #DDD;
border-radius: 2px;
display: inline-block;
height: 5px;
margin-right: 1px;
width: 62px;
}`,
],
})
export class StrengthCheckerComponent implements OnChanges {
@Input() public passwordToVerify: string;
@Input() public barLabel: string;
@Output() passwordStrength = new EventEmitter<boolean>();
bar0: string;
bar1: string;
bar2: string;
bar3: string;
msg = '';
private colors = ['darkred', 'orangered', 'orange', 'yellowgreen'];
private static checkStrength(p) {
let force = 0;
const regex = /[$-/:-?{-~!"^_@`\[\]]/g;
const lowerLetters = /[a-z]+/.test(p);
const upperLetters = /[A-Z]+/.test(p);
const numbers = /[0-9]+/.test(p);
const symbols = regex.test(p);
const flags = [lowerLetters, upperLetters, numbers, symbols];
let passedMatches = 0;
for (const flag of flags) {
passedMatches += flag === true ? 1 : 0;
}
force += 2 * p.length + (p.length >= 10 ? 1 : 0);
force += passedMatches * 10;
// short password
force = p.length <= 8 ? Math.min(force, 10) : force;
// poor variety of characters
force = passedMatches === 1 ? Math.min(force, 10) : force;
force = passedMatches === 2 ? Math.min(force, 20) : force;
force = passedMatches === 3 ? Math.min(force, 30) : force;
force = passedMatches === 4 ? Math.min(force, 40) : force;
return force;
}
ngOnChanges(changes: { [propName: string]: SimpleChange }): void {
const password = changes.passwordToVerify.currentValue;
this.setBarColors(4, '#DDD');
if (password) {
const c = this.getColor(StrengthCheckerComponent.checkStrength(password));
this.setBarColors(c.idx, c.col);
const pwdStrength = StrengthCheckerComponent.checkStrength(password);
pwdStrength === 40
? this.passwordStrength.emit(true)
: this.passwordStrength.emit(false);
switch (c.idx) {
case 1:
this.msg = 'Poor';
break;
case 2:
this.msg = 'Not Good';
break;
case 3:
this.msg = 'Average';
break;
case 4:
this.msg = 'Good';
break;
}
} else {
this.msg = '';
}
}
private getColor(s) {
let idx = 0;
if (s <= 10) {
idx = 0;
} else if (s <= 20) {
idx = 1;
} else if (s <= 30) {
idx = 2;
} else if (s <= 40) {
idx = 3;
} else {
idx = 4;
}
return {
idx: idx + 1,
col: this.colors[idx],
};
}
private setBarColors(count, col) {
for (let n = 0; n < count; n++) {
this['bar' + n] = col;
}
}
}
The secure password strength bar looks like the following screenshot.
Working Example
Finally, everything’s ready now. Check out the working example, hope this article helped you to learn “How to manage password strength”. Feel free to add your comment if any queries, also you can share your feedback.
If you like our content, please consider buying us a coffee.
Thank you for your support!
Buy Me a Coffee