In this article, we will discuss how Laravel Queues work. Laravel is one of the best and most usable PHP modern frameworks. Which provides rich features and functionality to its developer. Today, we discuss Laravel Queues which is known as one of the best features.
Table of Contents
Queue Introduction
The queue configurations are stored in the “config/queue.php” file. In this file, we will find connection configurations for each queue drivers. Some of the drivers already included in the framework, such as a database, Beanstalkd, Amazon SQS, Redis, and synchronous (sync) driver that will execute the jobs immediately (for local use). And null queue driver is discarding the queued jobs.
You can check the official documentation for more deep dive into the queues.
Prerequisites
We need a working Laravel application for implementing our test case. You can start with the given articles.
- Laravel Setup
- Laravel Default Authentication Setup
- Understanding Laravel Middleware
- Laravel Form Validations
- Laravel Form Request Validations
Now, we are going to make an example for sending an emails form backend using queues. As we know, email sending is a time-consuming task. So I’m going to make it easy and simple. We already wrote an article on the Laravel Mailable which one helps you to understand the working of Emails in Laravel application.
Setup Database for Laravel Queues
We will use Database drivers for our Laravel Queue example. You can use the following command to create migrations for the queue table.
php artisan queue:table
The above command creates a migration file at database/migrations directory. The created file contains a schema for the jobs table.
<?php

use Illuminate\Support\Facades\Schema;
use Illuminate\Database\Schema\Blueprint;
use Illuminate\Database\Migrations\Migration;

class CreateJobsTable extends Migration
{
    /**
     * Run the migrations.
     *
     * @return void
     */
    public function up()
    {
        Schema::create('jobs', function (Blueprint $table) {
            $table->bigIncrements('id');
            $table->string('queue')->index();
            $table->longText('payload');
            $table->unsignedTinyInteger('attempts');
            $table->unsignedInteger('reserved_at')->nullable();
            $table->unsignedInteger('available_at');
            $table->unsignedInteger('created_at');
        });
    }

    /**
     * Reverse the migrations.
     *
     * @return void
     */
    public function down()
    {
        Schema::dropIfExists('jobs');
    }
}
Now, time to run the migrate command. migrate command create a jobs table in your database.
php artisan migrate
The database is updated finally, now time to update our current queue driver for Laravel application. You just need to update your “.env” file.
QUEUE_DRIVER=database
Create Job
Now, we need to create a job using the following artisan command.
php artisan make:job SendWelcomeMail
After executing the above command, New job class is created at app/Jobs directory. By default, this directory is not available in the Laravel application. It is created when we create a job class.
<?php

namespace App\Jobs;

use Illuminate\Bus\Queueable;
use Illuminate\Queue\SerializesModels;
use Illuminate\Queue\InteractsWithQueue;
use Illuminate\Contracts\Queue\ShouldQueue;
use Illuminate\Foundation\Bus\Dispatchable;

class SendWelcomeMail implements ShouldQueue
{
    use Dispatchable, InteractsWithQueue, Queueable, SerializesModels;

    /**
     * Create a new job instance.
     *
     * @return void
     */
    public function __construct()
    {
        //
    }

    /**
     * Execute the job.
     *
     * @return void
     */
    public function handle()
    {
        //
    }
}
Create Mail
You can use the given command to create a new mail class.
php artisan make:mail WelcomeMail
After creating the mail class. We need to update the build function which returns a view.
<?php

namespace App\Mail;

use Illuminate\Bus\Queueable;
use Illuminate\Mail\Mailable;
use Illuminate\Queue\SerializesModels;
use Illuminate\Contracts\Queue\ShouldQueue;

class WelcomeMail extends Mailable
{
    use Queueable, SerializesModels;

    public $name = '';

    /**
     * Create a new message instance.
     *
     * @return void
     */
    public function __construct($username)
    {
        $this->name = $username;
    }

    /**
     * Build the message.
     *
     * @return $this
     */
    public function build()
    {
        return $this->view('emails.welcome')->with(['name' => $this->name]);
    }
}
You can check our previous article for more understanding on Laravel Mailable.
Setup Route
You need to add the following route in your routes/web.php file.
Route::get('email', 'JobController@processQueue');Create Controller
You can use the given command to create a controller to handle the queue job.
php artisan make:controller JobController
After creating the controller, we need to import the Job class.
<?php

namespace App\Http\Controllers;

use Illuminate\Http\Request;
use App\Jobs\SendWelcomeMail;

class JobController extends Controller
{
    /**
     * Handle Queue Process
     */
    public function processQueue()
    {
    	dispatch(new SendWelcomeMail('Sender Code Briefly'));

    	echo 'Mail Sent';
    }
}
Now, when we hit our defined route. Then the job mail processed.
After that check your database, where we create a jobs table. The jobs table contains one record. It’s storing the record when we hit the specific route.

Now the question is why? It because the process of the job is not started. You need to run the following artisan queue:work command.
php artisan queue:work
Delay DIspatch
If we want to add a delay in our queue, then you can use the Carbon package. Carbon is already added to the Laravel framework. You just need to import into your class.
<?php

namespace App\Http\Controllers;

use Illuminate\Http\Request;
use App\Jobs\SendWelcomeMail;
use Carbon\Carbon;

class JobController extends Controller
{
    /**
     * Handle Queue Process
     */
    public function processQueue()
    {
    	$emailJob = (new SendWelcomeMail('Pankaj Sood'))->delay(Carbon::now()->addSeconds(3));
   		dispatch($emailJob);
   		echo 'Mail Sent';
  }
}
Finally, when you execute the worker command in our terminal. Then the jobs table in our database is empty. And our terminal looks like.
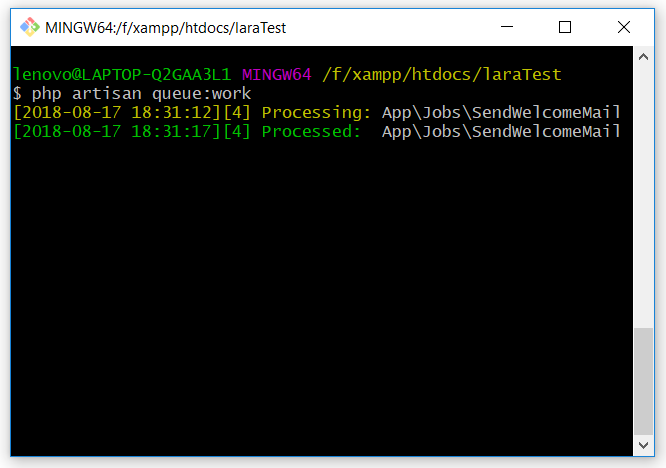
And when multiple queue jobs occur with delay. Then each of the mail sends after 3 seconds of the delay. In this condition, our terminal looks like.

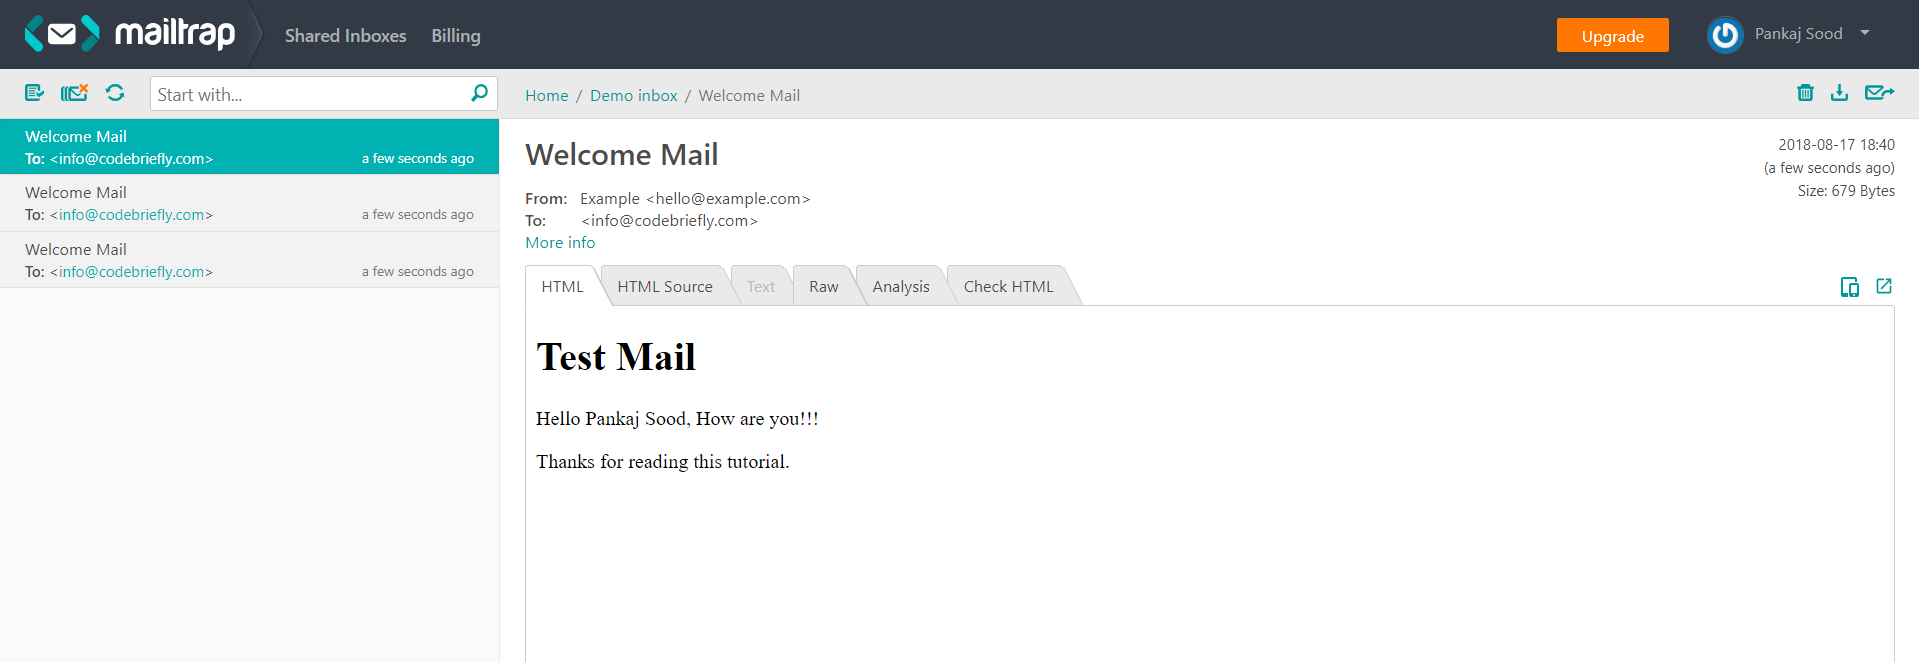
You can check the result in your mailtrap account. Where you receive all the emails.
![queue work mailtrap]() Conclusion
Conclusion
 Conclusion
In this article, I’m trying to explain to you how Laravel Queues work. I hope you get a clear understanding of the Laravel queue. But note that we have to run the queue:work command on the server. Otherwise all of the queue jobs stored in the database. Please feel free to add comments if any query or suggestion..
If you like our content, please consider buying us a coffee.
Thank you for your support!
Buy Me a Coffee
It should be mentioned, that running queues with the database driver is NOT recommended for a production system.
But if you really use the database driver, you must run only ONE queue worker, or you will run into serious trouble.
And your route ‘JobController@processQueue’ is NOT processing the queue, but is just dispatching a job to the queue. The Artisan command queue:work is processing the queue!
Hello Oliver
Thanks for informing me, I’m will update this article as soon as immediate 🙂
What should you insert to the SendWelcomeMail.php ???
what if i want to add an attachment to queue
there is no entry in jobs table
and php artisan queue:work is also not working.
how we can schedule post on social media(LinkedIn, pinterest etc..,) using laravel queue job?