In this article, We will discuss how to handle Emails with Laravel Mailable.
Before proceeding, I’m assuming you are familiar with the basics of the Laravel framework. If no then you can start with given articles.
- Laravel Setup
- Laravel Default Authentication Setup
- Understanding Laravel Middleware
- All You Need to Know Laravel Routing
- Setup Virtual Host with Xampp Server
Table of Contents
# Introduction and create a Laravel Mailable Class
In Laravel, each mail sent by the application is represented as a “mailable” class. All of these classes stored in the app/Mail directory. If this directory not found in the application file structure then don’t worry about it. That directory will be generated when we create our first mailable class. You can create this using the simple PHP Artisan command:
php artisan make:mail TestMail
After executing the above command, New Mail directory is located at App directory with TestMail.php file. This file contains a TestMail class which extends the Mailable.

Here’s the code snippet created by the above command.
<?php
namespace App\Mail;

use Illuminate\Bus\Queueable;
use Illuminate\Mail\Mailable;
use Illuminate\Queue\SerializesModels;
use Illuminate\Contracts\Queue\ShouldQueue;

class TestMail extends Mailable
{
    use Queueable, SerializesModels;

    /**
     * Create a new message instance.
     *
     * @return void
     */
    public function __construct()
    {
        //
    }

    /**
     * Build the message.
     *
     * @return $this
     */
    public function build()
    {
        return $this->view('view.name');
    }
}
The generated class should look like the snippet above. As you can see, the build method which returns the view. And we can replace the view.name with the path to our email view email.test-mail.
Let’s create a new blade template in an email folder located at resources/views/emails.
<!DOCTYPE html>
<html lang="en">
<head>
    <meta charset="UTF-8">
    <meta name="viewport" content="width=device-width, initial-scale=1.0">
    <meta http-equiv="X-UA-Compatible" content="ie=edge">
    <title>Test Mail</title>
</head>
<body>
    <h1>Test Mail</h1>

    <p>Hello {{ $name }}, How are you!!!</p>

    <p>Thanks for reading this tutorial.</p>
</body>
</html>
In the above snippet, you can see $name variable. We will update the name at the time of sending mail.
# Passing Data to Email Views
As you know the public property of the mailable class is automatically made available to the view file. Passing data to the view is as simple as making the data public on the mailable class.
Let’s create a public property $name and sent this to our mail view. In our view, we access the data like a normal variable.
public $name = 'John';
You can also use the Model query in the mailable class as per your requirement. You need to add “use App\ModalName” in your mailable class, then you can easily use the model class.
Here’s the code snippet with public property.
<?php
namespace App\Mail;

use Illuminate\Bus\Queueable;
use Illuminate\Mail\Mailable;
use Illuminate\Queue\SerializesModels;
use Illuminate\Contracts\Queue\ShouldQueue;

class TestMail extends Mailable
{
    use Queueable, SerializesModels;

    public $name = '';

    /**
     * Create a new message instance.
     *
     * @return void
     */
    public function __construct()
    {
        $this->name = 'John';
    }

    /**
     * Build the message.
     *
     * @return $this
     */
    public function build()
    {
        return $this->view('emails.test-mail')->with(['name' => $this->name]);
    }
}
# Configuring Our Mailer
To send mail, we will use mailtrap. Mailtrap is easy to use for testing the email. You need to update the SMTP settings in your “.env” file, which is located at the root of Laravel application.
MAIL_DRIVER=smtp
MAIL_HOST=smtp.mailtrap.io
MAIL_PORT=2525
MAIL_USERNAME=<mailtrap_username>
MAIL_PASSWORD=<mailtrap_password>
MAIL_ENCRYPTION=null
Mailtrap setup is simple and easy email testing for dev teams. You just need to update the credentials in the “.env” file because Laravel already adds other value like drive, host, port and etc in that file. After updating the credentials, you can test emails from your localhost.
Still having issues in configuring mail. Then you can check the settings in config/mail.php. If you are satisfied with the defaults, you can just leave it.
# Sending Extra Parameters
Adding from, cc, bcc, replyTo and the rest can be called on $this in the build method.
public function build()
{
    $address = 'test@codebriefly.com';
    $name = 'Test Mail';
    $subject = 'Test Mail';
    return $this->view('emails.test-mail')
        ->from($address, $name)
        ->cc($address, $name)
        ->bcc($address, $name)
        ->replyTo($address, $name)
        ->subject($subject)
        ->with([
        	'CustomOption' => 'CustomValue',
        	'CustomOption' => 'CustomValue'
        ]);
}
# Sending Email, Setup Route, and Controller
Routes are located at app/routes. All the routes based on the interface (web, API or console). Currently, we only need the web.php routes file.
Route::get('testmail','TestController@testmail');Here’s controller code snippet:
<?php
namespace App\Http\Controllers;
use Illuminate\Http\Request;
use Mail;
use App\Mail\TestMail;
class TestController extends Controller
{
public function testmail()
{
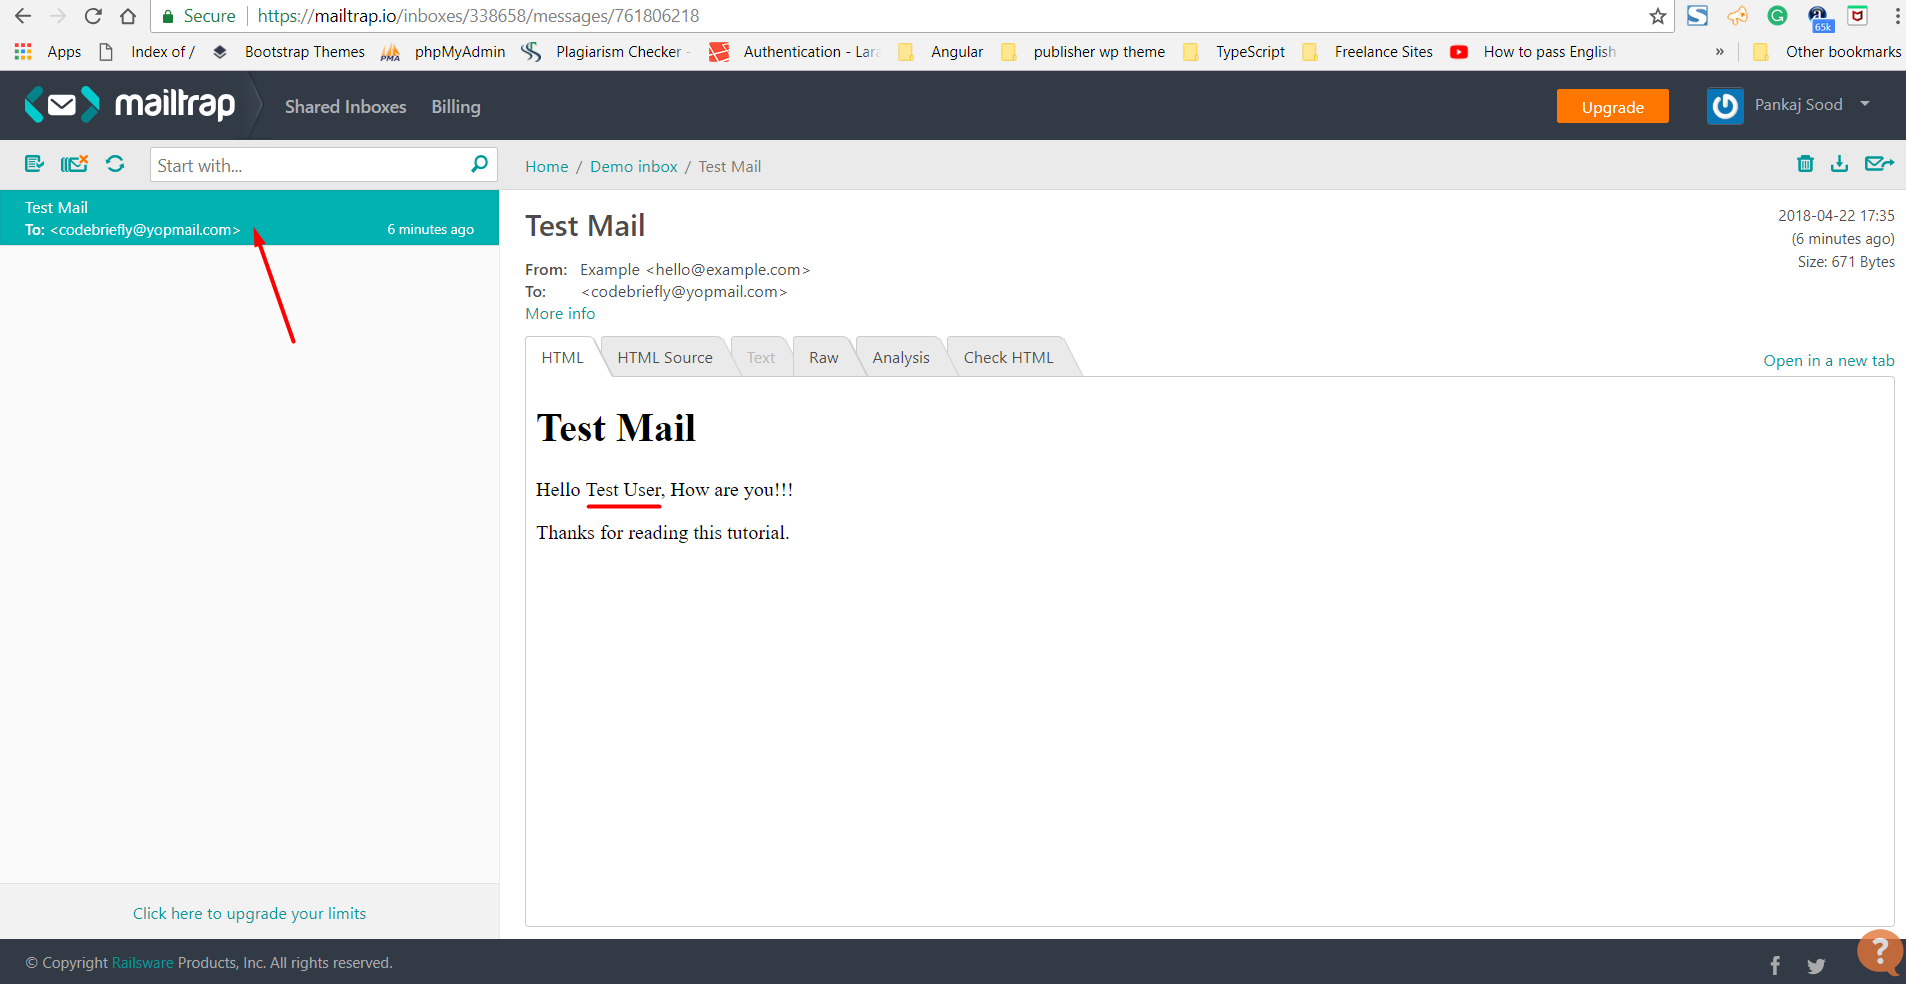
// Send an email to codebriefly@yopmail.com
Mail::to('codebriefly@yopmail.com')->send(new TestMail);
return back();
}
}Here’s the result:
# Conclusion
In this article, we will discuss Laravel Mailable. We will discuss more Laravel features in our future articles. Hope you like this article. Feel free to comment if any query.
If you like our content, please consider buying us a coffee.
Thank you for your support!
Buy Me a Coffee
How do I pass “John” to constructor from controller?
Hi Satish, You can check the following code example to send the data.
$name = 'john';

Mail::to('codebriefly@yopmail.com')->send(new TestMail($name));
After that, you can track this variable at the class constructor. Hope you get an idea from this. And I will update this post soon.