In this article, we will discuss “Laravel Observers”. Laravel provides us to implement the Observer pattern to fire some predefined events, which can be listened to hook into when various actions are performed on a model. No dought, it’s a great feature of the Laravel. Observer Class, methods receive the model as their only argument. And, Laravel does not include a default directory for observers. It will create dynamically when we create the observer.
Table of Contents
Why we need the Laravel Observer?
When you have used Laravel for a medium to large scale project, then you might have encountered a situation where you want to perform some actions while your Eloquent model is processing. Here, Laravel Observers are a convenient way to do this.
List of events given below, which we used in the Observer class:
- retrieved: after a record has been retrieved.
- creating: before a record has been created.
- created: after a record has been created.
- updating: before a record is updated.
- updated: after a record has been updated.
- saving: before a record is saved (either created or updated).
- saved: after a record has been saved (either created or updated).
- deleting: before a record is deleted or soft-deleted.
- deleted: after a record has been deleted or soft-deleted.
- restoring: before a soft-deleted record is going to be restored.
- restored: after a soft-deleted record has been restored.
- forceDeleted: handle the “force deleted” event.
I will recommend you to read the official documentation once for more understanding.
Create Laravel Observer
You can use the following command to create an observe class at “app/Observers” directory.
php artisan make:observer PostObserver --model=Post
After executing the above mention command in the terminal, the observer class will create at the defined location. Note that, by default, the observer directory is not available. But when we create an observer then the Observers directory will be created automatically.
<?php

namespace App\Observers;

use App\Post;

class PostObserver
{
    /**
     * Handle the post "created" event.
     *
     * @param  \App\Post  $post
     * @return void
     */
    public function created(Post $post)
    {
        //
    }

    /**
     * Handle the post "updated" event.
     *
     * @param  \App\Post  $post
     * @return void
     */
    public function updated(Post $post)
    {
        //
    }

    /**
     * Handle the post "deleted" event.
     *
     * @param  \App\Post  $post
     * @return void
     */
    public function deleted(Post $post)
    {
        //
    }

    /**
     * Handle the post "restored" event.
     *
     * @param  \App\Post  $post
     * @return void
     */
    public function restored(Post $post)
    {
        //
    }

    /**
     * Handle the post "force deleted" event.
     *
     * @param  \App\Post  $post
     * @return void
     */
    public function forceDeleted(Post $post)
    {
        //
    }
}
Register Observer
You can register your observers in the “boot” of the “AppServiceProvider” as per the following code snippet.
<?php

namespace App\Providers;

use App\Models\Post;
use App\Observers\PostObserver;
use Illuminate\Support\ServiceProvider;

class AppServiceProvider extends ServiceProvider
{
    /**
     * Register any application services.
     *
     * @return void
     */
    public function register()
    {
        //
    }

    /**
     * Bootstrap any application services.
     *
     * @return void
     */
    public function boot()
    {
        Post::observe(PostObserver::class);
    }
}
We have successfully configured the observer in our application. But, what is the use of this observer? So assume, we want to make an Audit of the post table and store the user data in the “post_audit” table. When the user create or update a post then we save the user data in this specific table.
Create Migration / Model
Use the following command to create a migration.
php artisan make:migration create_post_audit_table --create=post_audit
Open your newly created migration and add the required columns.
<?php

use Illuminate\Database\Migrations\Migration;
use Illuminate\Database\Schema\Blueprint;
use Illuminate\Support\Facades\Schema;

class CreatePostAuditTable extends Migration
{
    /**
     * Run the migrations.
     *
     * @return void
     */
    public function up()
    {
        Schema::create('post_audit', function (Blueprint $table) {
            $table->bigIncrements('id');
            $table->integer('post_id');
            $table->integer('user');
            $table->timestamp('action_at');
            $table->string('action');
            $table->timestamps();
        });
    }

    /**
     * Reverse the migrations.
     *
     * @return void
     */
    public function down()
    {
        Schema::dropIfExists('post_audit');
    }
}
Create a Post Audit Model
Use the following artisan command to create the PostAudit Model.
php artisan make:model App\Models\PostAudit
Open your newly created model and update the model as given below.
<?php

namespace App\Models;

use Illuminate\Database\Eloquent\Model;

class PostAudit extends Model
{
    protected $table = "post_audit";

    protected $fillable = [
        'post_id', 'user', 'action_at', 'action'
    ];
}
Update Observe
As I mentioned above, we are tracking the add and update record so in this Observer class we need to update the created and updated methods.
<?php

namespace App\Observers;

use App\Models\Post;
use App\Models\PostAudit;
use Auth;

class PostObserver
{
    /**
     * Handle the post "created" event.
     *
     * @param  \App\Post  $post
     * @return void
     */
    public function created(Post $post)
    {
        $audit = new PostAudit();
        $audit->post_id = $post->id;
        $audit->user = 1; //Auth::user()->id;
        $audit->action_at = date('Y-m-d H:i:s');
        $audit->action = 'Add';
        $audit->save();
    }

    /**
     * Handle the post "updated" event.
     *
     * @param  \App\Post  $post
     * @return void
     */
    public function updated(Post $post)
    {
        $audit = new PostAudit();
        $audit->post_id = $post->id;
        $audit->user = 1; //Auth::user()->id;
        $audit->action_at = date('Y-m-d H:i:s');
        $audit->action = 'Update';
        $audit->save();
    }

    /**
     * Handle the post "deleted" event.
     *
     * @param  \App\Post  $post
     * @return void
     */
    public function deleted(Post $post)
    {
        //
    }

    /**
     * Handle the post "restored" event.
     *
     * @param  \App\Post  $post
     * @return void
     */
    public function restored(Post $post)
    {
        //
    }

    /**
     * Handle the post "force deleted" event.
     *
     * @param  \App\Post  $post
     * @return void
     */
    public function forceDeleted(Post $post)
    {
        //
    }
}
Because I’m testing this functionality in the PHP artisan tinker so I’m using the static user id 1. As mention, you have to pass the current login user id.
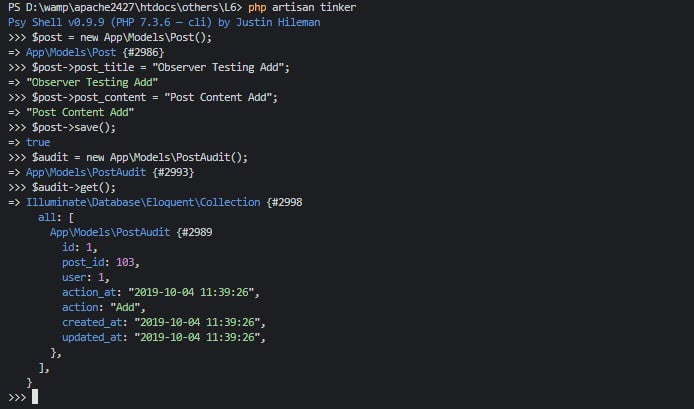
Testing the functionality using tinker
Add Post
Update Post
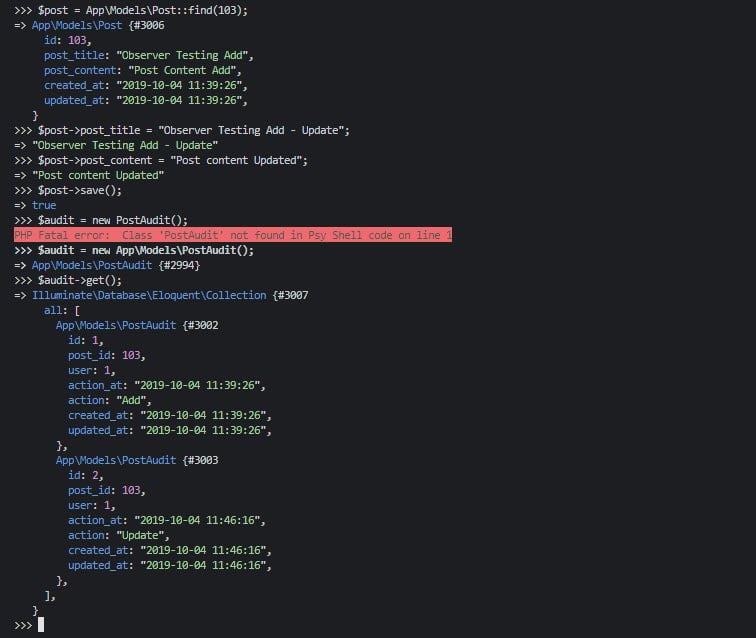
In the end, you can see the post_audit table track the action add/update whenever the post model is called.
Conclusion
In this article, I’m trying to explain to you the use of Laravel Observer. I hope you like this article and also helpful in your development. Please feel free to ask your query or submit your feedback 😉
You may like:
Laravel Scout with TNTSearch Driver
How to Use Make Auth in Laravel 6
How to Setup Lets Encrypt a Free SSL Certificate
If you like our content, please consider buying us a coffee.
Thank you for your support!
Buy Me a Coffee
Nice and simple