Brief Understanding on Laravel Repository Pattern Design
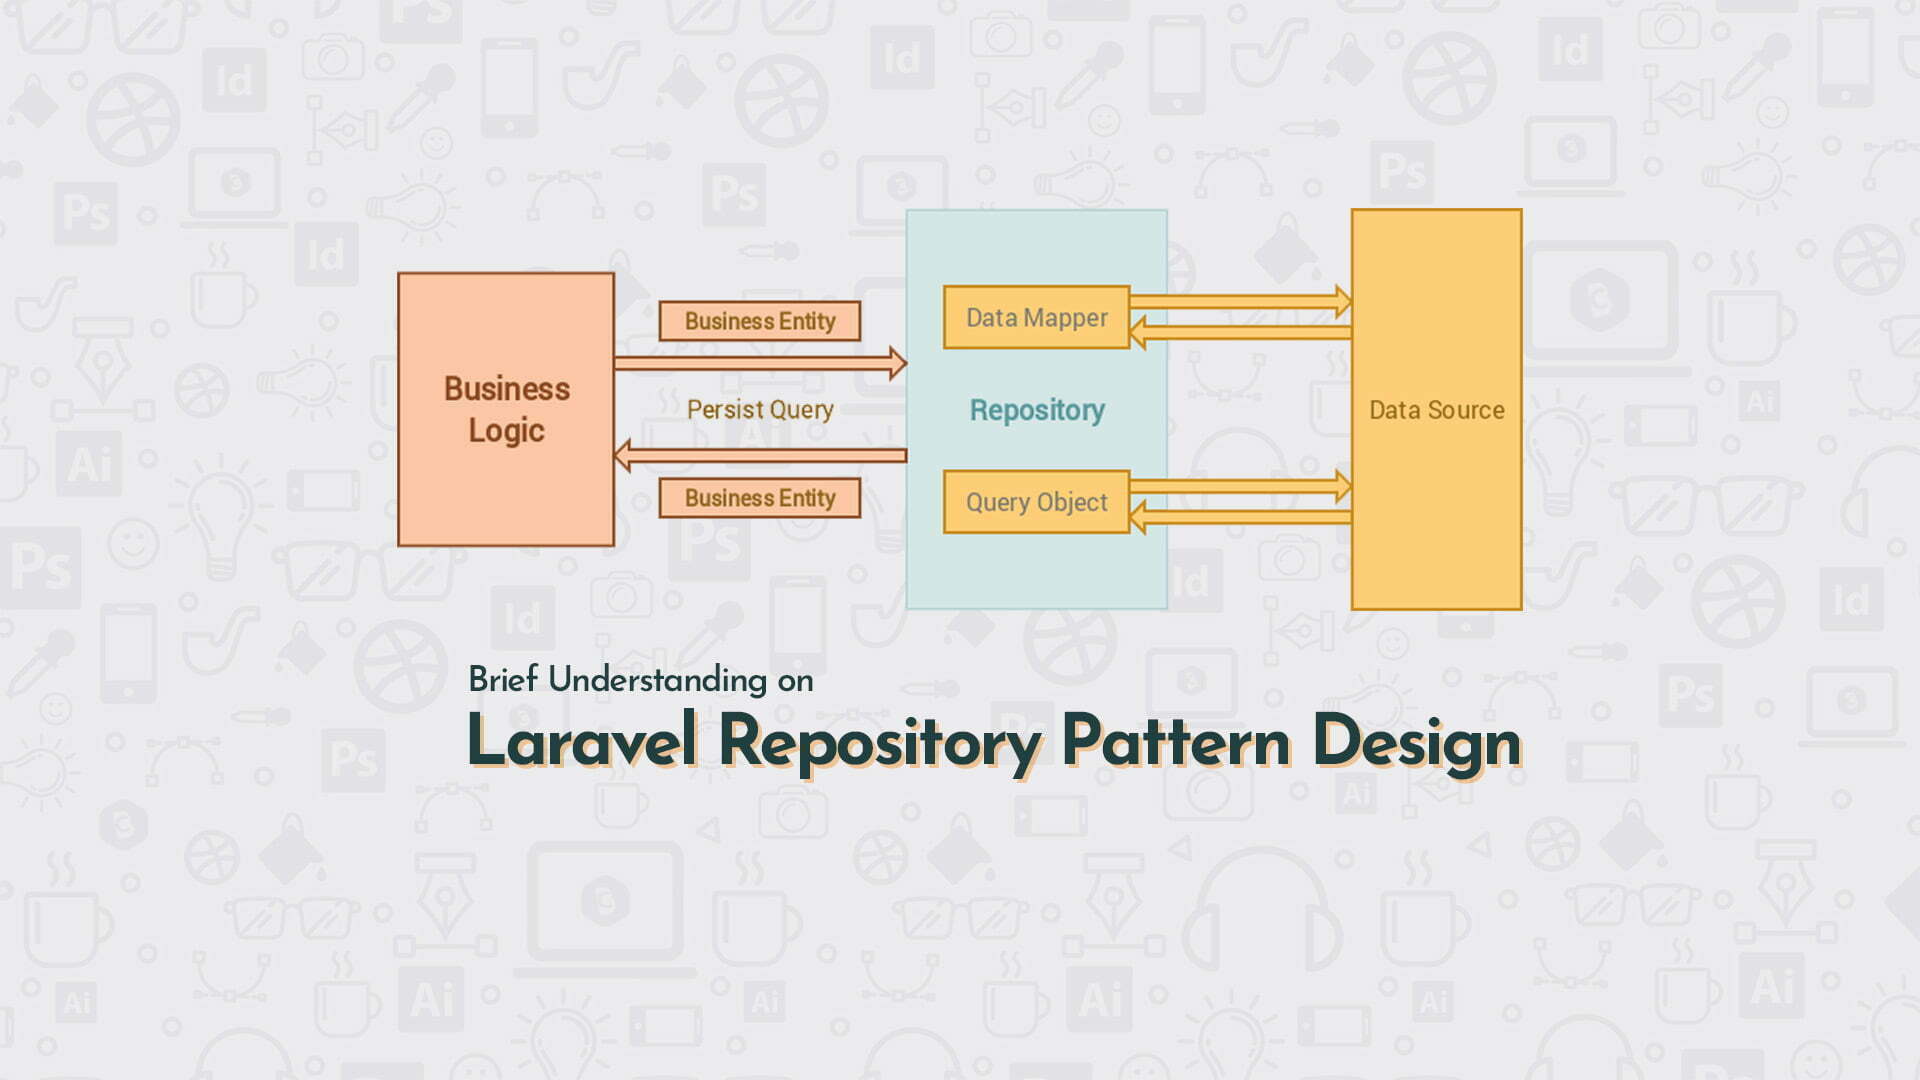
In this article, we will discuss the “Laravel Repository Pattern Design”. Using the Repository Pattern, we will add an extra layer between application logic and database. Assume, you want to change your DB from Mysql to MongoDB or anything else. Then Repository Pattern is much beneficial, application logics remain the same and all you have to do is change out the repository.
I’m assuming that you are familiar with the Laravel so I’m not describing the basic installation and other steps here. If you are not familiar with Laravel, then you can start with the following articles.
How to install Laravel 5 with Xampp using Composer
Setup Virtual Host in Windows with Xampp Server
Understanding Laravel Middleware
Create Repository
We’re going to refactor our app to use the Repository Pattern. The first step is to create a file for “app/Repositories/Repository.php”.
<?php
namespace App\Repositories;

use Illuminate\Database\Eloquent\Model;

class Repository implements RepositoryInterface
{
    // model property on class instances
    protected $model;

    // Constructor to bind model to repo
    public function __construct(Model $model)
    {
        $this->model = $model;
    }

    // Get all instances of model
    public function all()
    {
        return $this->model->all();
    }

    // create a new record in the database
    public function create(array $data)
    {
        return $this->model->create($data);
    }

    // update record in the database
    public function update(array $data, $id)
    {
        $record = $this->find($id);
        return $record->update($data);
    }

    // remove record from the database
    public function delete($id)
    {
        return $this->model->destroy($id);
    }

    // show the record with the given id
    public function show($id)
    {
        return $this->model-findOrFail($id);
    }

    // Get the associated model
    public function getModel()
    {
        return $this->model;
    }

    // Set the associated model
    public function setModel($model)
    {
        $this->model = $model;
        return $this;
    }

    // Eager load database relationships
    public function with($relations)
    {
        return $this->model->with($relations);
    }
}
In the above mention code snippet, we define our Repository class. Instances of this class have a model property that we tie to an Eloquent model. Once this is bound in the constructor we can call Eloquent methods like find, create, update or all from the class methods.
Create Interface
Now time to implements “RepositoryInterface”. It adds an extra layer of structure to our code. An interface is a contract that defines the methods a class MUST have defined. In our case the interface looks like this:
<?php
namespace App\Repositories;

interface RepositoryInterface
{
    public function all();

    public function create(array $data);

    public function update(array $data, $id);

    public function delete($id);

    public function show($id);
}
If we make new Repositories that implement this interface we’ll always know these methods are defined. Interfaces provide structure so we know what our code needs to do.
Use the Repository in the controller
In our PostController.php file, we instantiate a repository and pass in the Post model to it.
<?php

namespace App\Http\Controllers;

use App\Post;
use App\Repositories\Repository AS Repo;
use Illuminate\Http\Request;

class PostController extends Controller
{
    // space that we can use the repository from
    protected $model;

    public function __construct(Post $post)
    {
        // set the model
        $this->model = new Repo($post);
    }

    /**
     * Display a listing of the resource.
     *
     * @return \Illuminate\Http\Response
     */
    public function index()
    {
        return $this->model->all();
    }

    /**
     * Show the form for creating a new resource.
     *
     * @return \Illuminate\Http\Response
     */
    public function create()
    {
        //
    }

    /**
     * Store a newly created resource in storage.
     *
     * @param  \Illuminate\Http\Request  $request
     * @return \Illuminate\Http\Response
     */
    public function store(Request $request)
    {
        $this->validate($request, [
            'post_title' => 'required',
            'post_content' => 'required|max:1000'
        ]);

        // create record and pass in only fields that are fillable
        return $this->model->create($request->only($this->model->getModel()->fillable));
    }

    /**
     * Display the specified resource.
     *
     * @param  \App\Post  $post
     * @return \Illuminate\Http\Response
     */
    public function show($id)
    {
        return $this->model->show($id);
    }

    /**
     * Show the form for editing the specified resource.
     *
     * @param  \App\Post  $post
     * @return \Illuminate\Http\Response
     */
    public function edit(Post $post)
    {
        //
    }

    /**
     * Update the specified resource in storage.
     *
     * @param  \Illuminate\Http\Request  $request
     * @param  post id
     * @return \Illuminate\Http\Response
     */
    public function update(Request $request, $id)
    {
        // update model and only pass in the fillable fields
       $this->model->update($request->only($this->model->getModel()->fillable), $id);

       return $this->model->find($id);
    }

    /**
     * Remove the specified resource from storage.
     *
     * @param  post id
     * @return \Illuminate\Http\Response
     */
    public function destroy($id)
    {
        return $this->model->delete($id);
    }
}
The Laravel service container will automatically resolve our dependencies and inject them into the controller instance. I recommend you to check the Laravel documentation once for more deep understanding.
In the end everything ready, we have implements the Repository Pattern in Laravel. So go ahead and test your own. Please feel free to ask your query in the comment section, and also send me your feedback 😉
You may like:
Laravel Scout with TNTSearch Driver
Brief Understanding on Laravel Observers
How to Use Make Auth in Laravel 6
How to Setup Lets Encrypt a Free SSL Certificate
If you like our content, please consider buying us a coffee.
Thank you for your support!
Buy Me a Coffee
Wow your tutorial is very good.
Thank you.